|
The weather lately has been beautiful and spring-like! It has made it seem like winter is really over, even though the forecast calls for cold weather again soon. But to celebrate the nearness of Spring, and to tie in with Black History Month during February, we made paintings inspired by artist Alma Woodsey Thomas.  Alma Thomas got her inspiration from the natural world. She was born in Georgia, but spent most of her life in Washington, D.C., where she worked as an art teacher. She missed the green grass, sunshine, and trees, but could look out the window of her apartment and enjoy the garden planted below. The natural world was the inspiration for most of her paintings. Her painting style was unique. She built shape and form out of small dabs of paint, almost like puzzle pieces that fit together to make the image. Her works are abstract- meaning they don't look realistic. It's sometimes hard to tell what the painting is supposed to represent, but her descriptive titles help the viewer interpret her paintings. Here are some of Alma Woodsey Thomas's paintings, along with what inspired them-        For our own art-making, I asked students to think of something in nature that inspires them- something they feel strongly about and can remember in detail. It could be a happy spring day with birds singing, or the way the air smells after the rain, or maybe a scary, loud, thunderstorm! I gave them lots of ideas, but wanted them to choose for themselves. Their task was to represent their idea using only dots and dabs of color. We used oil pastels first, then painted over it with tempera cake paint. They did a great job!     
0 Comments
My younger students spent last week practicing drawing geometric forms. It teaches them to draw from observation- to notice the length of lines and the overlapping of shapes. It teaches them to draw what they actually see. We started by drawing cubes. It was interesting that in almost every class, a student told me, "But we already know how to draw cubes!" They meant this type of drawing:  I explained to them that this was a "math-style" cube. You draw it the same way, every time, without having to look at an actual cube. You are drawing it based on information from your BRAIN, rather than from your EYES. I asked each student to pick up one of the foam cubes and hold it in front of them at eye-level. Then we lifted them higher, and lower, and twisted them to the left and to the right. We observed how the lines and angles and shapes changed depending on how we looked at the cube. To start the drawing practice, I had students draw just the cubes to begin with. I set a timer for five minutes and asked them to draw the cube over and over until the timer stopped. It was not a race or a contest to see how many they could draw- instead, I wanted them to focus on drawing it more realistically and accurately each time. At the end, I asked the students to look back at their first cube and compare it to their last- most of them agreed, the more they drew it, the better they got!  a second grade example  a first grade example  a kindergarten example Next, students chose a variety of shapes and arranged them into an interesting composition. At the beginning of the week, I let each student pick from the whole tub of shapes, but as the week went on I made bags of shapes to save time, and just let them pick the color. 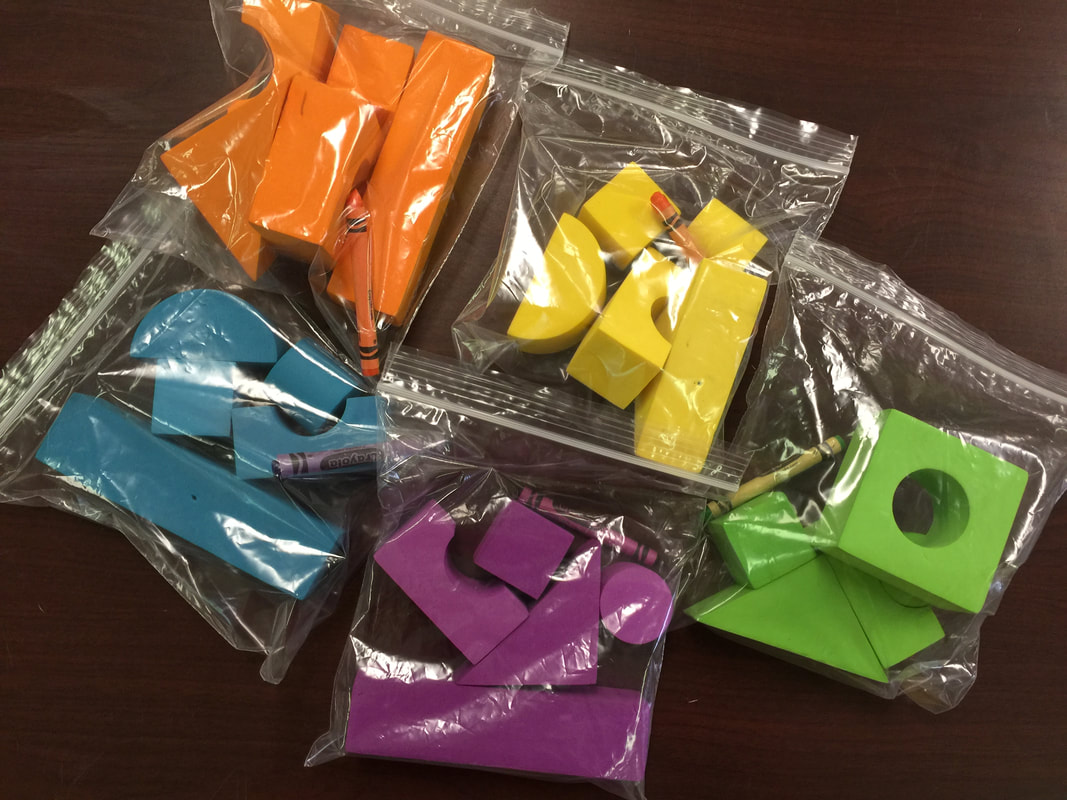  This drawing task was a challenge for kids- some of their brains were just not quite ready to grasp transferring a three-dimensional shape into a flat drawing. But some of them really got it! It was interesting to see the varying ability levels in each grade level. Some of the kindergarten students were more successful than some of the second graders! It just depends on how ready their brains were. But, it was a good exercise for all students. It helps them begin to look at objects like an artist. I tell them all the time, "You use your brain to make art just as much as you use your hands!" I worked very hard to keep it from being a frustrating lesson for the students who weren't quite ready. I made sure they each knew that I just wanted them to TRY this drawing, and that it was just practice and we wouldn't be hanging them up in the hallway.  second grade  first grade  first grade  kindergarten 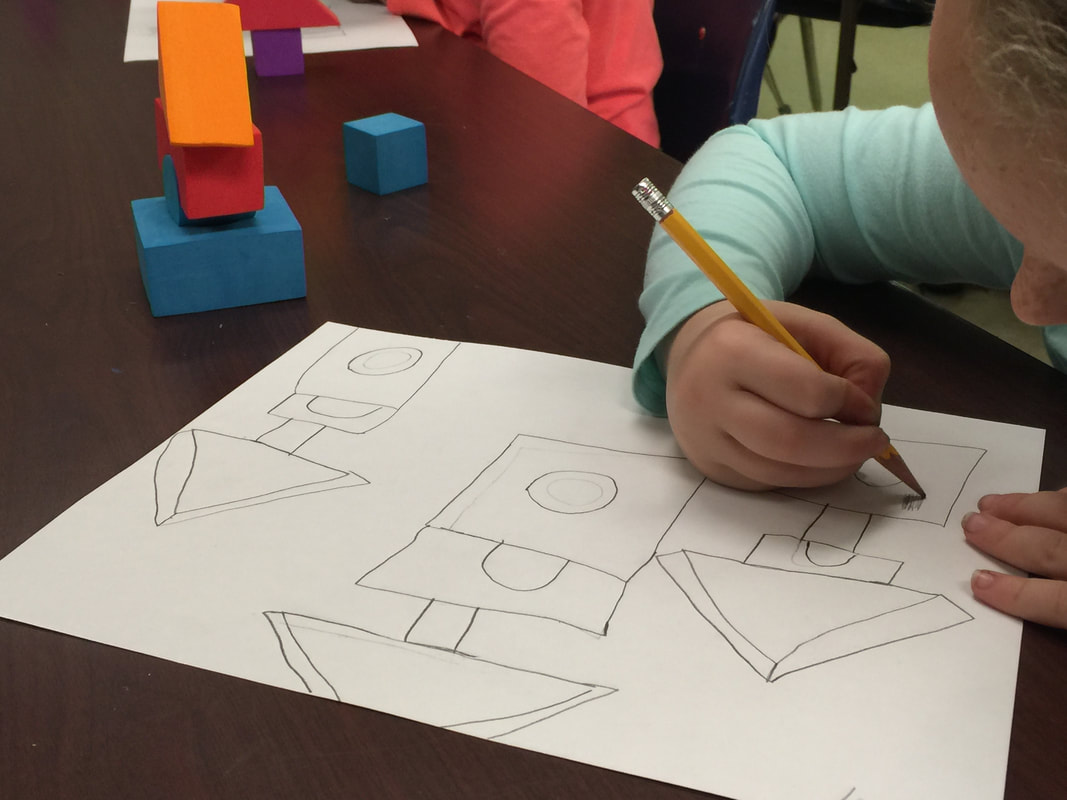 second grade  first grade  first grade  second grade The next step was to introduce kids to the concept of shading- showing the darks and lights, the highlights and shadows. Again, some kids were not quite ready to grasp this, but some did great!  first grade  kindergarten  first grade  kindergarten  second grade I am interested to see if this drawing practice makes a difference in the observational drawings we'll do in the future!
To support their current IB unit, first grade artists got to design their own money! First we looked at the design on our American money. We looked at the symbols and what they each represented, and talked about the important and respected leaders that are pictured. We watched this video explaining how money is made: Next we looked at some money from other places. We compared the symbols pictured on their money to the images represented on ours. Some of the money had buildings on it, some had people, and some had animals! We decided that when a country chooses what designs to put on their money, they are communicating what they think is important and what they consider valuable. 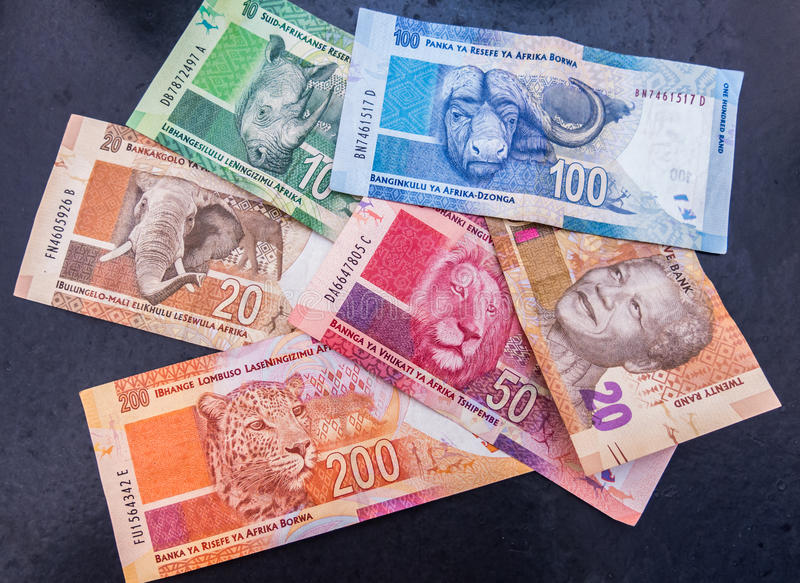 South Africa's money  Australia's money  Indonesia's money  Malaysia's money  Papua New Guinea's money Next, students designed their own money! They could use a place that really existed, or they could make up their own land. The example I drew for them was for South Carolina money, and the symbols I chose were a palmetto tree, peaches, the beach, and the mountains. Students loved coming up with their own ideas! Here are just a few examples:     This project was from nearly a month ago, but I am trying to get caught up on project posts! Kindergarten students made these heart paintings the week of Valentine's Day. It was a good opportunity to practice making patterns, and to explore the resist technique that happens when you paint on top of oil pastels. The paintings turned out beautifully, and the kids were really proud of their work!           One of the things I like most about teaching art is using it to teach real-life skills. Art teaches kids how to make a plan and follow it, how to take a mistake and turn it into something good, how to be determined and see something through until the end... and lots of other good things! One real-life situation I wanted my kids to experience was having to work within a budget. Second graders are in the middle of an IB unit with economic themes- topics like good and services, and how supply and demand are related. To support this learning, I made my art students pretend to buy the supplies they wanted to use! But first, they had to earn some "money". During their last project, I passed out plastic gold coins as rewards for any good thing I saw students doing. They earned coins for things like staying on task, following directions the first time, and helping with clean-up procedures. I made sure everybody earned at least a few coins, and most students ended up with about ten. Several students had fifteen or more coins! At the end of that day, students turned their earned "money" back into me and I wrote down their total. We compared this to putting money in the bank- it's still your money, you're just letting someone else hold it.  This week, they got to "spend" their money at our pretend Art Supply Store. I gave each student back the number of coins that they had earned, and they could use them to purchase anything they wanted. I tried to offer some unusual or special items that they don't normally have access to- like glitter crayons, colorful paper, metallic markers, neon oil pastels, yarn, buttons, beads... along with the typical scissors, glue, markers, colored pencils, paint, etc. To make the math easy, each item cost one coin.   But first, I had students make a plan and write a shopping list. I had them write their total number of coins at the top, and then number that many lines down. They needed to think about the project they had in mind and carefully plan what they needed. I wanted them to avoid spending all their money on glitter crayons, only to realize they forgot to buy paper to draw on! It was important for them to think all the way through their project and predict all of their needs. This is a hard skill, but an important one!    Of course, students ran into some problems. In one situation, there was no more red paint left and a student really wanted some. She learned she could barter with another student who wanted her gold sharpie, and they made a trade! In a different situation, a student wanted yellow paper, but there was only one piece and another student had already claimed it. The student offered his classmate TWO coins and was able to buy it from him! I wanted these types of problems to occur, so that students could explore some problem-solving skills. Students had complete freedom over what they made, so there were some interesting creations! Here is some of their work:                 I finally get to share these precious kindergarten self-portraits! This is my favorite kindergarten project yet. These paintings show such personality, and I know parents will treasure them! We painted the faces in a previous lesson, so the next step was to paint the shirt and add the face and hair. The reason this project was so successful was that I structured the day so that only a small group was painting at a time. I was able to focus my attention on about five students at a time, and ensure that each student had everything they needed. While I was working with the groups, the others got to enjoy a play-dough day. They loved it! Here are some in-progress pictures:     We made the backgrounds by scribbling colored chalk onto construction paper, then blending it with a paper towel.   And here are the finished self-portraits! I am so pleased with how they turned out.  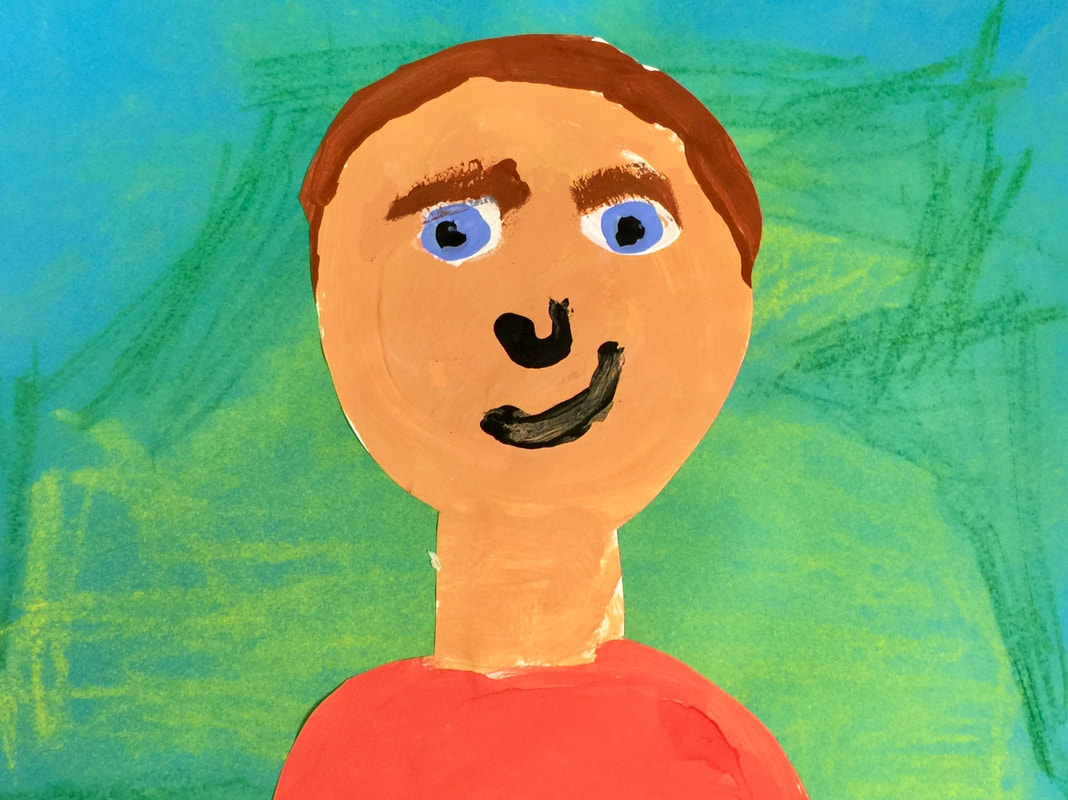    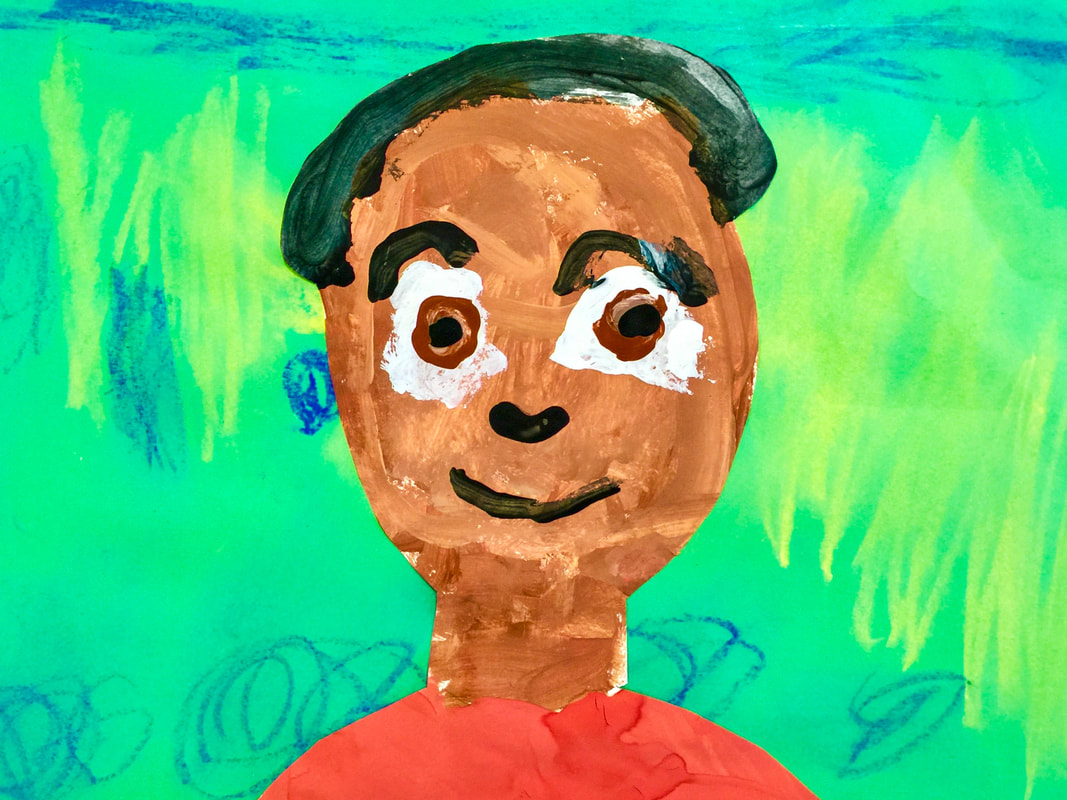        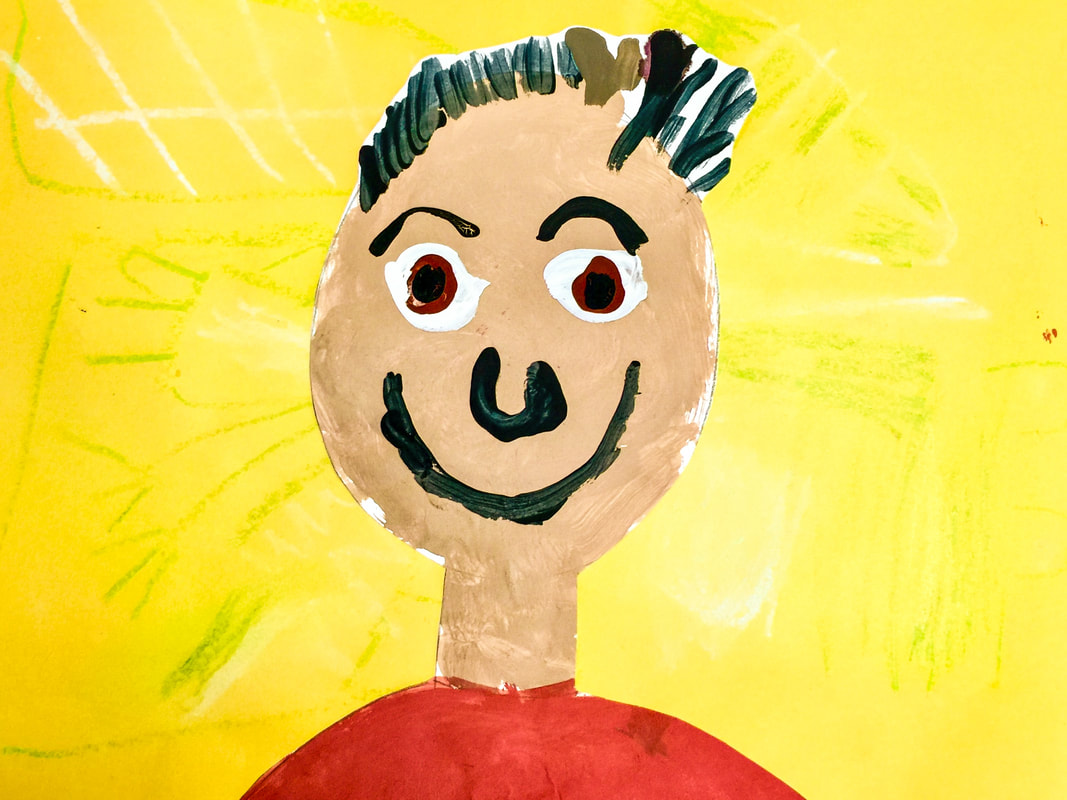  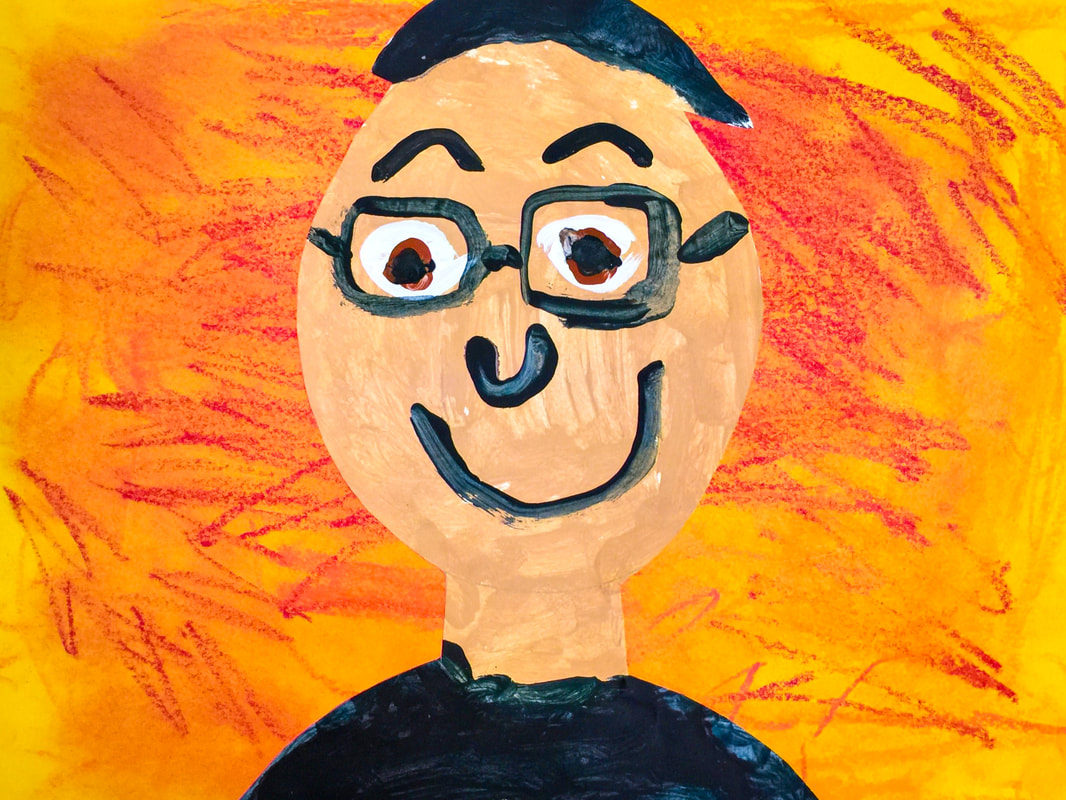  This is one of my favorite projects for when I need a quick, one-day lesson, yet something that all students can be successful with. These are abstract designs using the letters of the students' names! To begin, students write the letters of their names in all different directions. I tell students to write a letter, then rotate their paper. Then write another letter, and rotate the paper again, continuing until their name is complete. The trick is to arrange the letters so they connect and form enclosed spaces. Often the student will need to write their name more than once, or write their middle or last name, to have enough letters to fill the space.   Students then color each enclosed space. I have taught this project using a variety of art materials, but the most successful has been oil pastels. The way the colors blend and create texture is a nice touch. Sometimes I have students choose a specific color scheme, but this time they just chose as many colors as they wished. It's nice to have students trace their lines with a black oil pastel to make them look more polished.     These designs are still a work in progress... we ran out of time and didn't get finished! We saved them to complete another day. I like to use this fun book as a closure activity for this lesson- the Turn Around, Upside-Down Alphabet Book!  Each year, the Gifted Art group at Hendrix collaborates to create a book. This year's book is the fourth in the series. It's titled The Rainbow Brush, and is styled after Marcus Pfister's The Rainbow Fish.  The book tells the story of a not-very-nice paintbrush who is fortunate to be more colorful than the other brushes- similar to the Rainbow Fish's colorful scales in the original story. Throughout our story, the Rainbow Brush learns the value of sharing, and comes to understand what it means to be a true friend. Please enjoy this digital version of our book! Our book The Rainbow Brush joins three previous collaborations:    This lesson was a one-day skill-builder activity before we start our next big project. The goal was for students to increase their understanding of color relationships and how intermediate colors are created. In addition, the intricate painting process helps students develop their brush-handling skills. In the first step, students used a black crayon to draw a continuous line spiraling out from the center of their paper. They could use a simple round spiral, or different shape- some students chose triangles, rectangles, or hearts.  Students painted their spirals by beginning with one color in the center, then blending into an adjacent color. In doing the blending, intermediate colors like red-orange and blue-green were created. When students had made a full revolution around the color wheel, they continued into another round. Students needed to use careful brushwork to avoid the colors mixing into a muddy mess!        This kindergarten activity was the beginning step of the project that will be featured at this year's Art Show. We are going to be painting self-portraits! The lesson was an exploration of mixing skin tones. We started with the wonderful book, The Colors of Us, by Karen Katz. This book celebrates the differences in our skin colors and points out how beautiful the variations are. Each student received a paper plate with a blob of each primary color (red, blue, and yellow) plus white. I challenged them to mix and blend the colors until they had created the perfect color to represent their own skin.   The most fun part was that students got to paint on their hands to see how closely their color matched!    The lesson was about mixing colors, but the REAL lesson was that we are all made up of the SAME colors- just mixed into beautifully different combinations!    These paintings will be the beginning layer of our self-portraits. Next week we'll add the faces and hair.  |
Archives
March 2018
Categories
All
|
 RSS Feed
