|
To support their current IB unit, first grade artists got to design their own money! First we looked at the design on our American money. We looked at the symbols and what they each represented, and talked about the important and respected leaders that are pictured. We watched this video explaining how money is made: Next we looked at some money from other places. We compared the symbols pictured on their money to the images represented on ours. Some of the money had buildings on it, some had people, and some had animals! We decided that when a country chooses what designs to put on their money, they are communicating what they think is important and what they consider valuable. 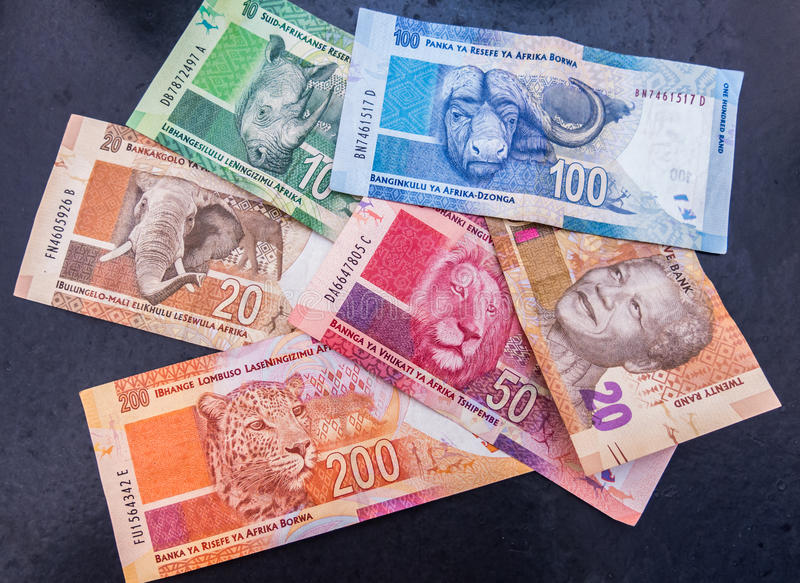 South Africa's money  Australia's money  Indonesia's money  Malaysia's money  Papua New Guinea's money Next, students designed their own money! They could use a place that really existed, or they could make up their own land. The example I drew for them was for South Carolina money, and the symbols I chose were a palmetto tree, peaches, the beach, and the mountains. Students loved coming up with their own ideas! Here are just a few examples:    
0 Comments
This kindergarten activity was the beginning step of the project that will be featured at this year's Art Show. We are going to be painting self-portraits! The lesson was an exploration of mixing skin tones. We started with the wonderful book, The Colors of Us, by Karen Katz. This book celebrates the differences in our skin colors and points out how beautiful the variations are. Each student received a paper plate with a blob of each primary color (red, blue, and yellow) plus white. I challenged them to mix and blend the colors until they had created the perfect color to represent their own skin.   The most fun part was that students got to paint on their hands to see how closely their color matched!    The lesson was about mixing colors, but the REAL lesson was that we are all made up of the SAME colors- just mixed into beautifully different combinations!    These paintings will be the beginning layer of our self-portraits. Next week we'll add the faces and hair.   Our school is participating in a Global Artist Trading Card Swap! An Artist Trading Card, or "ATC", is a miniature work of art that can be traded and collected, kind of like baseball cards. This is our school's first year making and trading ATCs, but our kids are loving it and are excited about making it a Hendrix tradition. Our students have been making and trading cards with each other all year long, but now we have the opportunity to trade with artists outside the Hendrix community! Here's how the swap works: it's hosted by a school in Minnesota, and teachers all over the world send in their students' ATCs. The host school will send our cards to other schools, and send us other cards in return! Click here to see how last year's trade worked- it's a really neat process! One of the things I included in our packages of ATCs was a link to this blog post. I am hoping that the schools who receive our cards will find this page. If you are from one of those schools, I would love for you to leave a comment and tell us where you are in the world! Here are some selections from the two hundred Artist Trading Cards that we mailed. Each card is beautiful and unique, and the product of really hard work from our incredible Hendrix artists!  Second grade students made these self-portraits as an extension of the self-portrait projects they recently finished. (See their previous drawings here and here.) For these ATCs, students first made the drawings in permanent marker, then added color with liquid watercolors in either warm or cool colors.   These "Rainbow Squiggle Paintings" by second, third, and fourth graders are so pretty. Our students were SO careful and precise when painting them- and they really enjoyed the process! We started by using a tiny brush to paint a squiggly line in the middle of the card. Then, students continued to add lines in various colors, following the contour of the original line as closely as possible.    Next are these marker print ATCs. In this post you can see the whole process of making the marker prints using styrofoam and water-based markers. My kids LOVED this process. I had several kids tell me they begged their moms to take them to the dollar store so they could buy styrofoam plates to do more at home. I love when a project is so engaging that my kids want to continue it when they leave the art room! My fourth grade Gifted Art group made this set of prints and embellished them using metallic markers.  Fourth graders also made these cards featuring their Color Name Poems. This project was an extension of this painting and poetry project we worked on right before the holiday break in December. We cut their extra paintings down to ATC-size, and students collaged the best line from their poems on top. Both the colors and the poetry are absolutely gorgeous!    This next set of ATCs represents the largest portion of our cards- I think 80 of our total 200 cards came from this project. I think these are some of our most beautiful contributions. Rather than creating the cards in the traditional ATC size, students instead made large paintings and then cut them into smaller pieces. Students made the paintings in response to music they were hearing. The focus was on expressive mark-making... for example, the student might have painted fast, zig-zag marks in response to energetic, bouncy music, while choosing slow, swirling, marks in response to a more calm style of music. I didn't have a chance to take pictures of this group of kids painting, but here is a similar project that my kindergartners did earlier in the year. It's one of my favorite lessons for any age student.    The last set of cards I want to share are ones that students created independently, rather than as part of a whole-class project. They are of a variety of different media and subject matter. Students worked on these cards as an early-finisher project after their main art projects were completed. These are some of my favorites, as they really capture my students' unique personalities!  Our cards needed to be packaged in sets of ten before being mailed. I tried to include as much variety in each set as possible! I wanted each school that received our cards to have some of each type of card, if possible.  And here are our 200 cards, each wrapped with a paper telling about our school and our state, as well as including contact information to reach me and to access this blog. Hendrix is reaching out to the world!  One last thing, and this is mostly for other art teachers who may be reading this after receiving our cards- I always love seeing how other art teachers have their classrooms set up, especially in other parts of the world. Here is a glimpse inside our classroom at Hendrix Elementary in South Carolina:    I hope you'll have a minute to explore the rest of our blog, and I'd love if you could leave us a comment!  This is a really special project that I love doing with our kids. It's a great way for students to connect to their heritage and learn more about themselves and their family history. It's a great connection to second grade's current IB unit, which focuses on relationships, communities, and culture. Here are our "Heritage Self-Portraits":               Our school has an event coming up that we call our "Hendrix Family Fiesta". Part of being an IB school means celebrating all the cultures that make up our school family. This event will honor the traditions and celebrations of Mexico! While researching traditional art techniques of Mexico, I learned a LOT! I wish we had longer than one class period to explore Mexican art and craft together, but we only had one hour. Though Mexico has a very rich history in the arts, I decided to focus our learning on something our students would be familiar with - the technique of papel picado, or "punched paper". This craft originated in the Mexican state of Puebla, in the town of Huixcolotla, and spread to other parts of the country.   The traditional technique involves a skilled craftsman using a variety of chisels and a hammer to punch through many sheets of paper at once. The design can take hours to create, and templates are made so that a design can be repeated. The subject matter of the designs often features the beauty of nature- like flowers, birds, or fruits, but can really be any design. The technique is a tradition usually passed down from parent to child. These images are of papel picado craftsmen using the traditional method.   We watched a small portion of this video to get a better idea of how the process works. We started watching at about the 1:34 time. I learned from my research that different colors of papel picado are used for different types of celebrations. Pinks, oranges, and purples are often used to celebrate Dia de los Muertos, while different shades of purple are used at Easter. The colors of the Mexican flag are used to celebrate Mexico's Independence Day, and rainbow colors are used for the Christmas season as well as non-religious events. Our version of the papel picado technique is very simple, but still beautiful! Students folded colored paper using a pleating fold, then used scissors to cut out simple shapes. When opened, the papel picado looks like delicate lace! We used masking tape to connect the pieces together.          I think our students really enjoyed getting to experience this traditional art-making technique. I hope it helped students to respect and honor traditions of the past. I am looking forward to celebrating more at our Fiesta later this week!  Fourth graders jumped right into this project at the start of the school year. Their work is finally finished and ready to share! The title of this project is "Meaningful Places. " I asked the students to think of a place that had meaning for them. Some students chose the country of their heritage, others chose previous homes or favorite vacation spots, and some chose places connected to special memories. For inspiration, we looked at the work of some master landscape artists of the 20th century. We noticed how these artists used bright colors and bold outlines to bring strong emphasis to the shapes in their work.  Andre Derain Charing Cross Bridge 1906  Henri Matisse Forest at Fontainebleau 1909  Maurice de Vlaminck Restaurant la Machine at Bougival 1906 Students used their iPads to find an image to use as inspiration for their work. I printed each student a copy of their image and we used them as the base for the artworks. The next step was to add color using oil pastels. Students could choose to use natural colors or to be inventive with their color choices. We explored how colors could create contrast in the image. Students also experimented with blending and layering the oil pastels to create texture and shading.     The finishing touch was to outline the shapes with black glue. This created the bold shapes like in the master works we first looked at.   Here are some of the finished artworks! They will be on display at our upcoming festival later this week. I asked each student to write a short explanation to be displayed with their artwork.  "This is my apartment that I live in. It is near our school. We have a balcony. Our apartments are tan and brown. People come and visit us. We are very happy where we are. Our neighbors are really nice. Me, my mom, and our dog live in our apartment." - Indea  "This picture is like Myrtle Beach. I chose this place because it reminds me of my aunt. It is special to me because I saved a starfish there. It reminds me of my baby cousin." - Sonya  "I picked this picture because it is located in Mexico. It is cool to be in Mexico." - Ruben  "This picture is from Texas. I chose this place because it's where I was born. It is special to me because I was born there. It reminds me of summer." - Addyson  "I chose this picture of the Charleston bridge because I used to live there. I used to drive across that bridge to go to school. My mom used to work across that bridge." - Shepherd 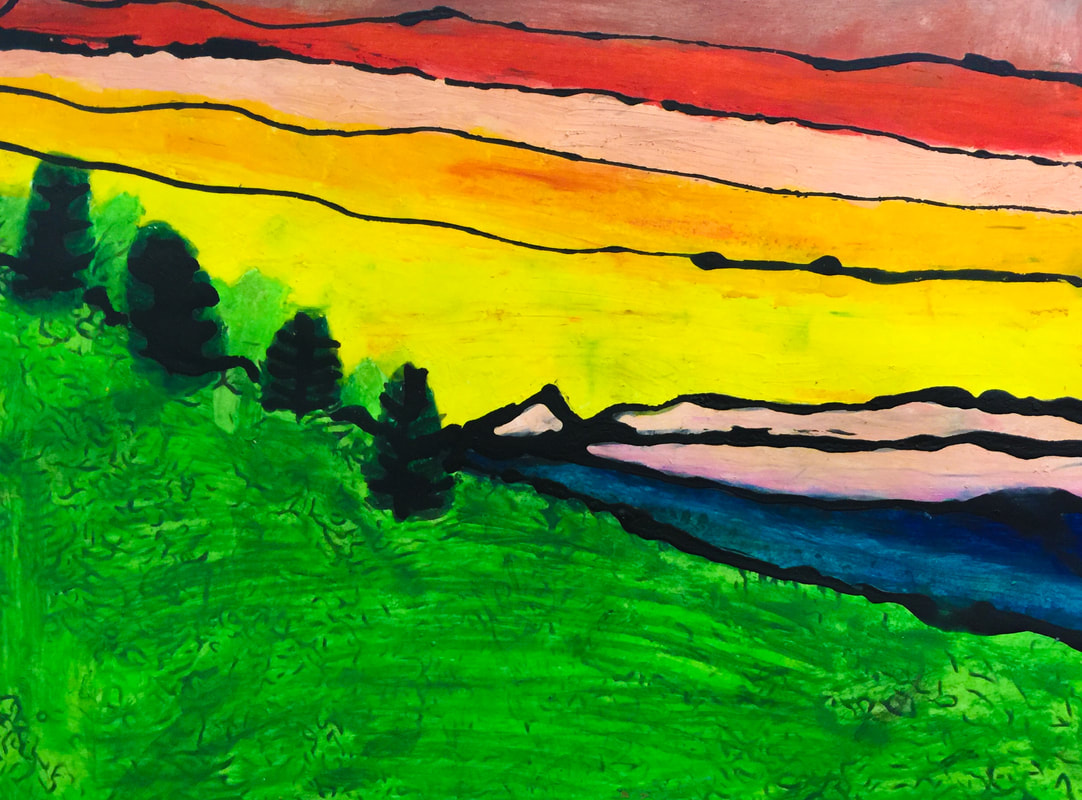 "My artwork is a sunset on the Cherokee village. I chose it because I have Cherokee in me and it is a very beautiful place. Their sunsets are very pretty and I love this place." - Chloe  "I chose this picture so people can see my home. It's special because it's where I live. It reminds me of my grandpa." - Jadyn 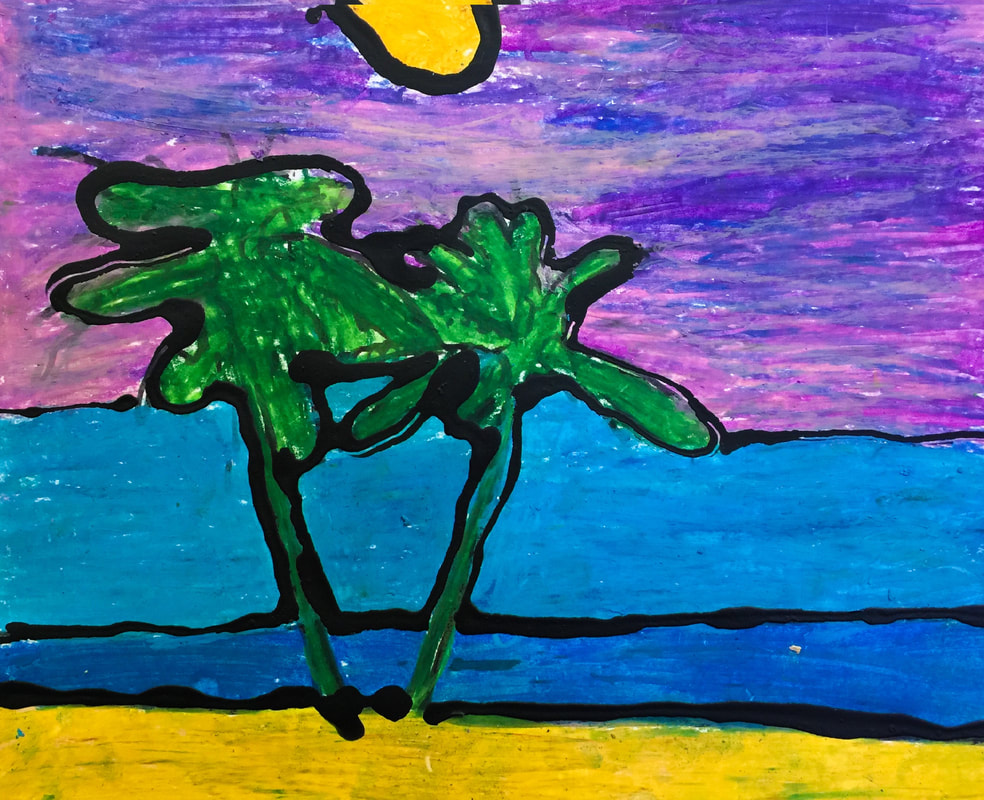 "This is a picture from Hawaii. I chose this place because it looks very pretty. It reminds me of a sunset on the ocean." - Ava 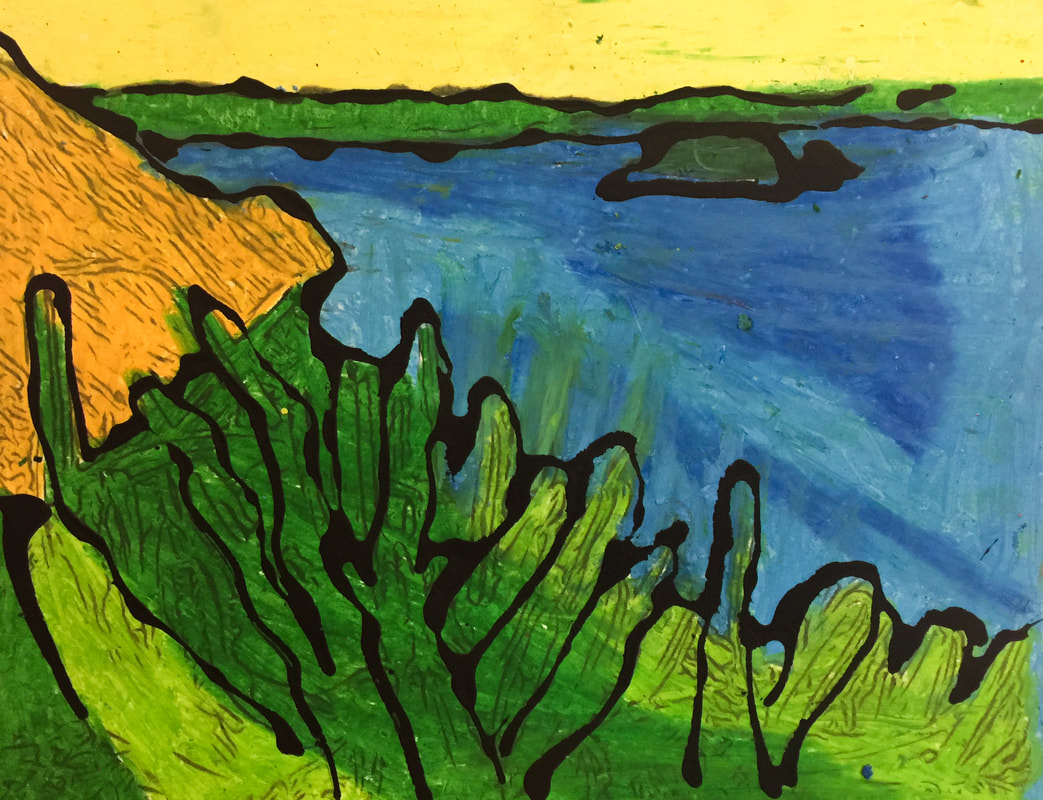 "This picture is from Mexico. I chose this place because I am going to Mexico in the summer. It is a special place because it reminds me of my grandma and grandpa. I love Mexico! " - Nelissa 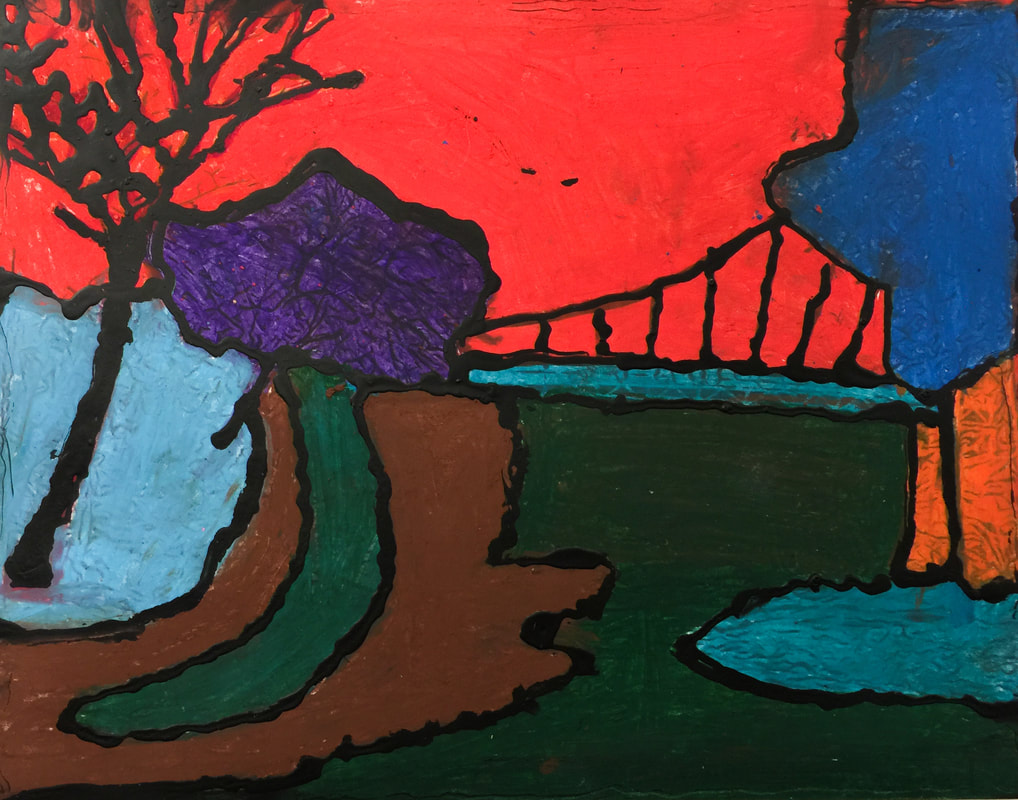 "This picture is from Greenville. I chose this place because I want to go there. It is special to me because I love adventure. It reminds me of my family." - Olga  "This is a picture of a beautiful place in Thailand." - Winston  "I chose this because it's where I'm from. It's Zimapan, Hidalgo in Mexico. I love that it's where my family is from." - Abigail  "I chose this place because I lived there. It is my apartment in Maryland. It's special to me because my brothers live there." - Carlos  "This picture is from California. I chose this place because it is a wonderful place to relax. It is special to me. It reminds me of a lake I live close to. " - Veronica  "This picture reminds me of my Grandpa because he lives in Mexico. It is sad because he will never come here to my house." - Marely  "This picture is from the beach. I got to go there last year. It was my first time to see the ocean." - Oswaldo  "I chose this picture because Mexico is where my mom was born. It is a special place because my family came from Mexico. This is special because we do some of the celebrations that Mexico does." - Moises 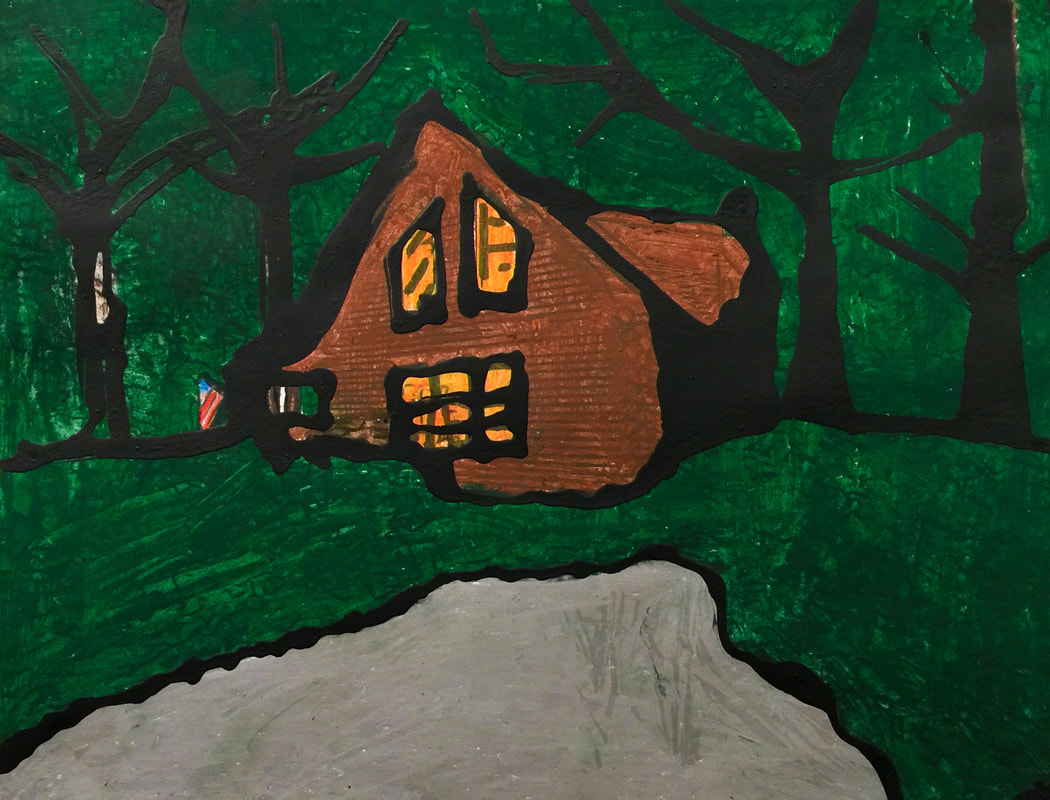 "This picture reminds me of a time that I went to a cabin with my family. I was five years old and the cabin we went to was haunted with a friendly ghost." - Shaniya  "This is a city in Mexico. I chose this because my grandma, grandpa, aunt, and mom are from Mexico." - Arisdelsy  "This is Knoxville, Tennessee. It is the capital of my home state. It reminds me of the first home I had. I've been there once. We went there when I was eight." - Grayson  "When I was little my dad would take me and my sisters to the mountains. We would sleep in a cabin and my dad and cousin would teach us survival skills and help us make breakfast on a fire. " - Jacoby  "This picture is from Cambodia. I chose this place because it is thousands of years old. It's special because my people respect the Angkor Wat." - Ardynn  "I chose this picture from Mexico because it is meaningful to me. I like the ocean and the sand and the beautiful sky." - Samuel  "I chose this picture because I learned that I had African in me and I didn't know. So this picture is of an African landscape with mountains." - Maranda  "The Great Smoky Mountains is a place me and my family go every year. We usually stay in a cabin and spend time together."
- Abbey To enhance their study of Native American culture, third grade artists got to make their own Native American paintbrushes this week! Long ago, people had to use whatever resources were available to meet their needs. They had to make the tools that were needed to get the job done. Paintbrushes were one of those tools! To start, we looked at modern-day paintbrushes and learned some terminology:  Students had already studied Tomie DePaola's book The Legend of the Indian Paintbrush. It tells the story of a young boy named Little Gopher and his journey to capture the beautiful colors of a sunset. The book describes how Little Gopher makes paintbrushes from animal hair and bone, and stretches buckskins for painting surfaces.   I asked students to create their own paintbrushes from natural materials like Little Gopher did in the story. Each brush needed to have a handle, bristles, and a ferrule- the part that attaches the bristles to the handle. I provided a few supplies- rubber bands and tape- but the method of construction was up to each student.       The next step was to actually try painting with these brushes! Each student used bright colors of paint to try to replicate Little Gopher's sunset painting.    We had just enough time left to do a little reflecting on these hand-crafted paintbrushes compared to modern-day brushes. Most students were thankful we live in a time where we can buy the things we need instead of having to make them!  "This was an awesome experience but I would rather be here because I could not live a day there. I love being creative but that's too much. It's easier being here. I love doing that kind of stuff but I'd rather do it here."  "In the old days people had to make paintbrushes. In the now days people buy paintbrushes from stores. I would buy a paintbrush. People don't make paintbrushes in the now days. They don't want to make paintbrushes. "  "It was so cool to build a paintbrush by myself. I am very glad I had the materials to build it. It was a fun experience, though I am glad I live in the time I am in." To further compare paintbrush-crafting methods of then and now, we finished up with this "How It's Made" clip of a modern-day paintbrush factory! Last year's group of third graders had a similar experience with making paintbrushes- click here to see examples! I always try to have my kindergartners paint on the very first day of Art. I know that might seem like a lot to expect, since many of them have never been in school and have never even held a paintbrush (some not even a pencil!) but I like that it makes their first art experience a memorable and engaging one. This year, I introduced the painting process with my new favorite book- "To Be An Artist".  The book celebrates all different types of art forms. It teaches that making art is not always just drawing, painting, and sculpting- playing instruments, singing, dancing, weaving, sewing, acting, and even creative writing are all ways of making art! My favorite thing about the book is that it is written with a global perspective. The images from the book are of children from all over the world!     After seeing the children in the book making art, we were ready to make our own artworks. My goal for this lesson was really just to get a paintbrush in each child's hand- I wanted to give them the experience of painting, rather than focus on making a finished product. Students worked with a partner to make large collaborative paintings that we added to each day. By the end of the week, and after multiple painting sessions, lots of little hands had contributed to each artwork!        Here are some of the finished paintings- they are so bright and beautiful!    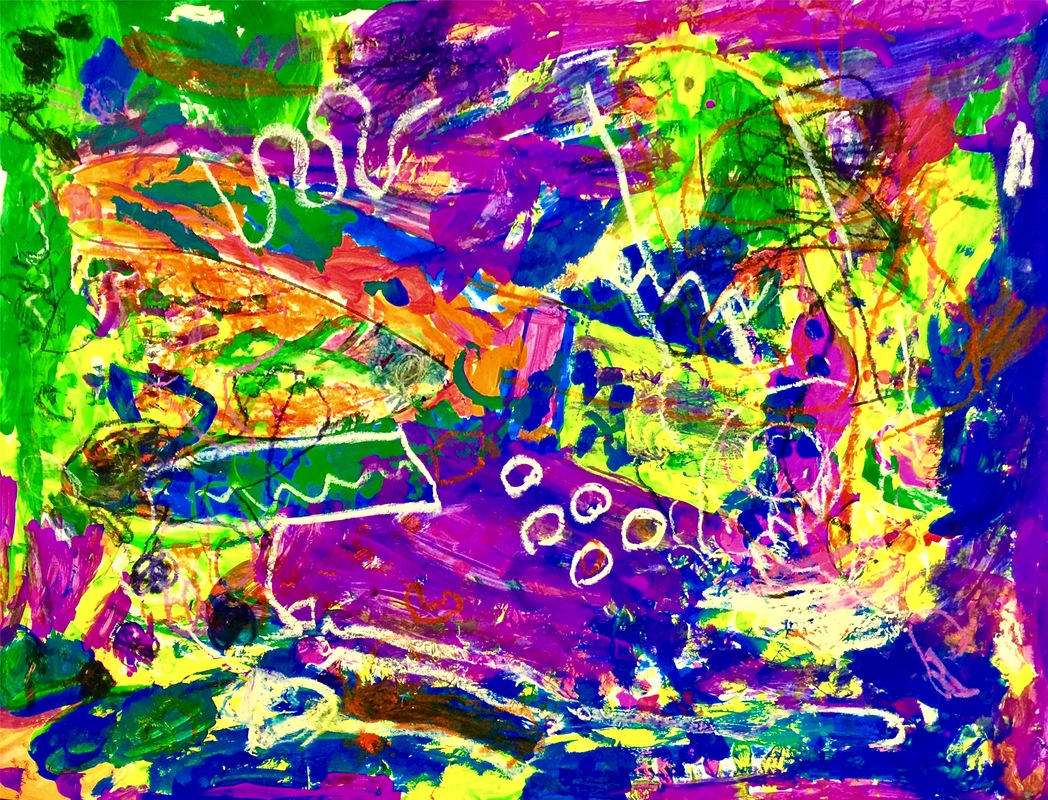   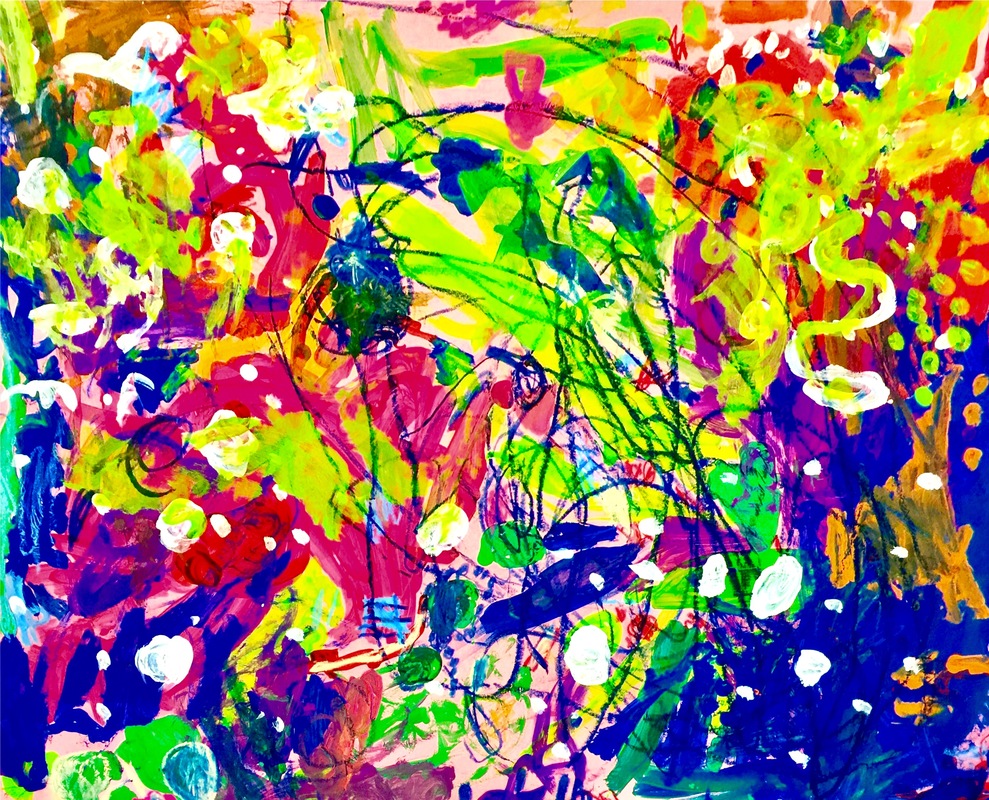 The school year is winding down, and it's the time of year when we can do some "just-for-fun" projects. Art Club's latest work definitely falls into that category! In our next-to-the-last meeting, I showed my kids how to marble paper using shaving cream and liquid paint. Our original inspiration for this project came from the Japanese craft of suminagashi- a method of marbling paper using water and special inks. The craft dates back thousands of years, and the name means "floating ink". Students loved looking at examples of the intricate designs. We even found a video demonstrating the process!  examples of traditional suminagashi Here's the method we used: Each student spread a layer of shaving cream in a tray. It's important to use the foamy white shaving cream, not the gel kind. We used plastic cards to scrape and smooth the surface, just like spreading frosting on a cake.  Next we dripped liquid watercolor paint onto the surface. If you want to do this at home, food coloring would make a good substitute.   We used the end of a paintbrush to carefully swirl the colors, being sure to keep the color on the surface instead of mixing it all the way through the shaving cream.  Next, carefully lay a sheet of paper on top of the design. Lightly tap your fingers over the surface to be sure no air bubbles are trapped inside. Give the paper a few seconds to soak up the paint.  Then grab a corner of the paper and pull it back. Some of the shaving cream will stick to the paper, and it will look like a foamy mess, but that's okay!  The final step is to use a plastic card to scrape away the leftover foam. Then the design will show through!  You can use the same tray of shaving cream multiple times, until it starts to look dirty. Just use the plastic card to smooth the surface between prints. The papers will dry in a few minutes, and can then be used for all sorts of art projects! Beautiful cards, gift tags, origami designs... anything you can think of!  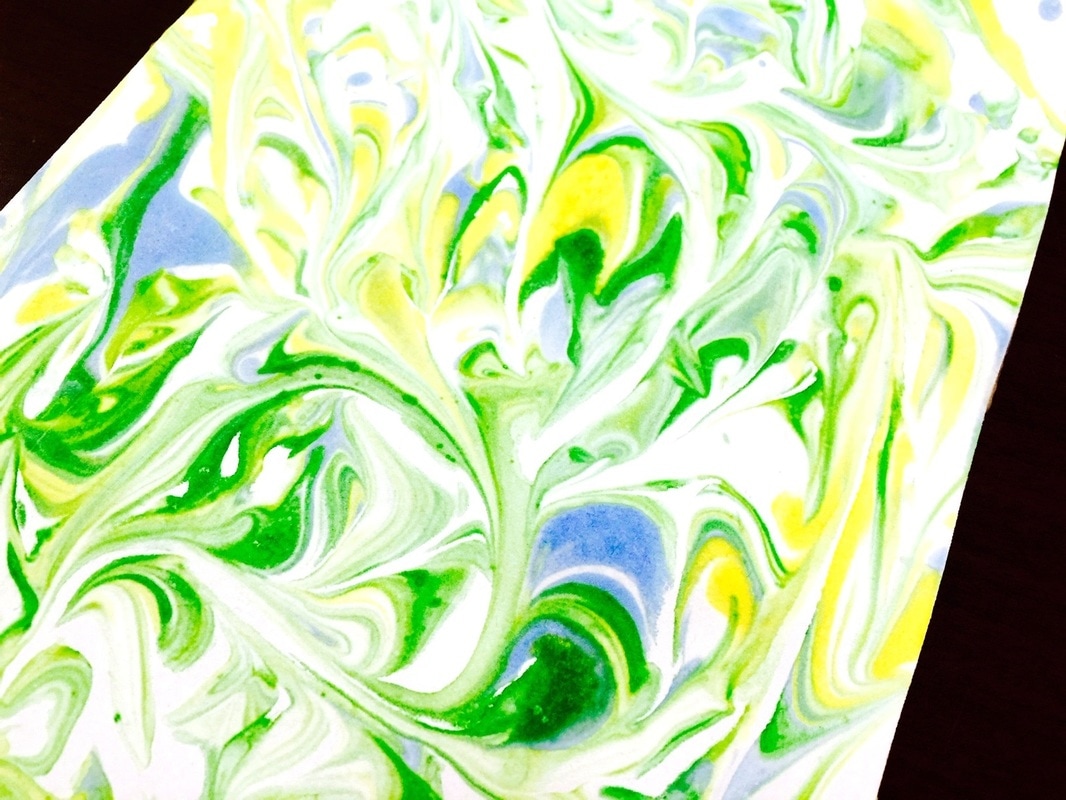    This is the final week of first grade's "trip around the world"! It was been a really interesting experience, and I can tell the kids have learned a lot. They have been so excited to pretend to visit each new place! This week's focus was Jamaica. I did not know much about the culture of Jamaica before I began researching for this lesson. One of the things I found was that Jamaican culture is a combination of all the people groups that made up the island's population, and much of their traditions, food, language, and even artwork is a blend of these influences. This video gave us a good overview of what daily life might be like in Jamaica, and how their culture is both alike and different from America! One of the interesting things I learned about Jamaica was that back in the British Colonial times, in the time of new settlements and developing trade routes, Jamaica was a source of beautifully hand-crafted wooden furniture. Jamaica had an abundance of rich forests- the country was called "the land of wood and water". Jamaican people were able to harvest the wood and use it to create furniture, which became highly desired by British traders. Much of this furniture was carved, like this example of a Jamaican-made bed from the 1800's.  Other types of furniture were made in the caned style. Caning is a type of weaving which involves lacing reeds or thin strips of wood to a frame. It was common to see caned chairs, sofas, or tables. It is a very intricate and time-consuming process! Caning furniture is a traditional craft that is still evident in modern-day Jamaica.   First graders experienced a little bit of the weaving process by creating paper-weavings. We used the colors of the Jamaican flag, which are black, yellow, and green. The black in the flag symbolizes the strength of the people, the yellow represents sunlight, and the green is a symbol for the natural resources.    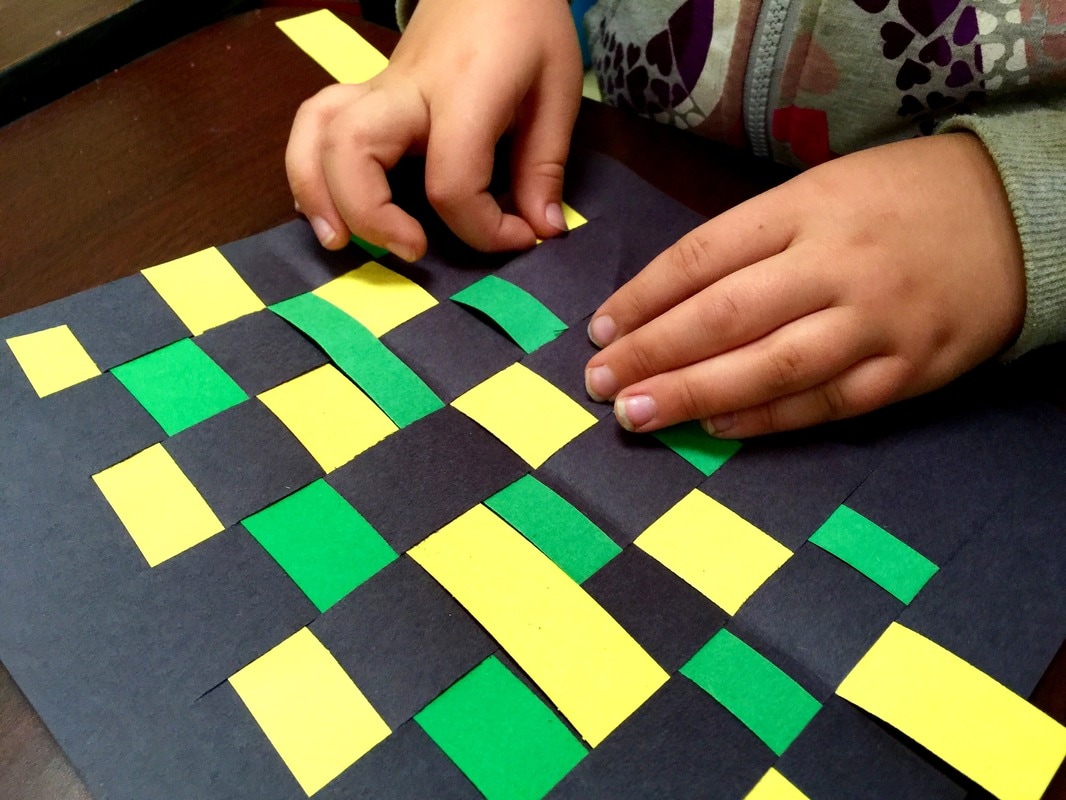   |
Archives
March 2018
Categories
All
|
 RSS Feed
