 This lesson was very interesting to reflect on. I did the same activity with both my fourth graders AND my kindergartners! My goal for my kindergartners was simply for them to realize that our human bodies are put together in a particular way- we have heads, torsos, and limbs. Young children often draw bodies in ways that don't make sense. Sometimes they draw big heads with tiny bodies underneath, or they draw normal-sized heads and torsos, yet scrunch the legs up to be very short. Or sometimes they even draw the arms and legs coming out of the head, skipping the torso altogether- like a Mr. Potato Head. These are all normal developmental stages that children naturally progress past. Through our practice in studying and drawing these manikins, I just wanted them to THINK about what they were drawing.       I repeated the same drawing activity with fourth graders. My objective for this lesson was a bit more specific. This grade level is beginning a new IB unit centered around the concept of "Structure"- how things are put together. They'll be investigating this concept in a variety of different subject areas. Through observing and drawing these manikins, I wanted students to think about the "structure" of the human figure- how our bodies are put together. They've studied the skeletal structure of our bodies in Dance, and learned how our muscles are connected to the bones, and that moving them together is what allows us to hold ourselves up yet still flex and bend. This drawing activity is an extension of that prior learning. Much like the kindergarten students, I wanted fourth graders to draw with accuracy in representing the head, torso, and arms and legs. As these students are quite a bit older, their drawings are much more realistic and have better form. I started each fourth grade class session by showing students examples of the kindergarten drawings- I challenged them by pointing out how much detail the younger students could capture, and said that if a five-year-old can draw like this, show us what someone twice that age could do! Here are my fourth graders at work:      
0 Comments
To complement first grade's learning about our solar system, we made these beautiful interpretations of Vincent Van Gogh's Starry Night! One of my favorite tools to use with students is this interactive viewer. It has a function that lets you "zoom in" on paintings, and we used it to look very closely at Starry Night. We were looking for the swirly brushstrokes Van Gogh used to create the texture in his night sky. It's amazing how up-close we can get!!     I have actually seen the real Starry Night, when it was at the High Museum in Atlanta several years ago, and you certainly can't get this close to it in real life! To begin our own versions of the painting, students tried to mimic Van Gogh's swirling marks. We mixed and blended many shades of blue and white.    Next, we created the ground. We cut black construction paper and used crayon to make colorful marks that looked like the choppy textured brushstrokes Van Gogh used.  The next step really made these paintings come to life- we added the stars! We carefully observed how Van Gogh created rings around his stars using dashed lines to form concentric circles, like this:  This was my favorite part of the painting process- and the students' favorite, too! These skies are so beautiful!      For a finishing touch, we used colored paper to create a village below the starry sky.    Here are the finished landscapes!      As Van Gogh once said, "Looking at the stars always makes me dream..." To end the lesson on a fun note, we enjoyed these Starry-Night themed videos! A few years ago I discovered the work of artist Fleur Isbell. I wanted to teach a lesson inspired by her work, but the timing never worked out. Until this year!  Fleur Isbell is a contemporary designer who recently did a series of work inspired by global weather patterns. She uses technology to generate images using coded data about weather conditions in places all over the world. The images take their color and shape from information about that location's typical temperature, precipitation, cloud cover, wind speed and direction, as well as the longitude and latitude of the location. Here are some of her images:  She created an app based on this work, and the user can manipulate the way the data is generated to change the image. Its very complicated to explain, so here's where you can go to try it for yourself! As you can see if you open the site, you can type in any location and generate an image based on data about that location's weather. By sliding the circles under each category, you can increase or decrease the effect of that data and create many different images!  For this lesson, I wanted students to experience how traditional art and technology can come together. They used their iPads to create digital images using the Global Pattern Generator app, and then used that image as the basis for a painting. Through making the painting, they had to observe closely to accurately replicate the shape and proportion of each color, as well as practice mixing and blending colors to create the correct hue.   (I promise, we were careful with the iPads near the paint!!)   Overall this lesson was a success and a lot of fun, but I am going to make some tweaks if we repeat it with next year's fourth graders! I think there are a lot more opportunities for learning with this project. Here are a few of my kids' paintings along with the digital image that inspired each. Look closely to see the location each student chose- there is quite a variety!     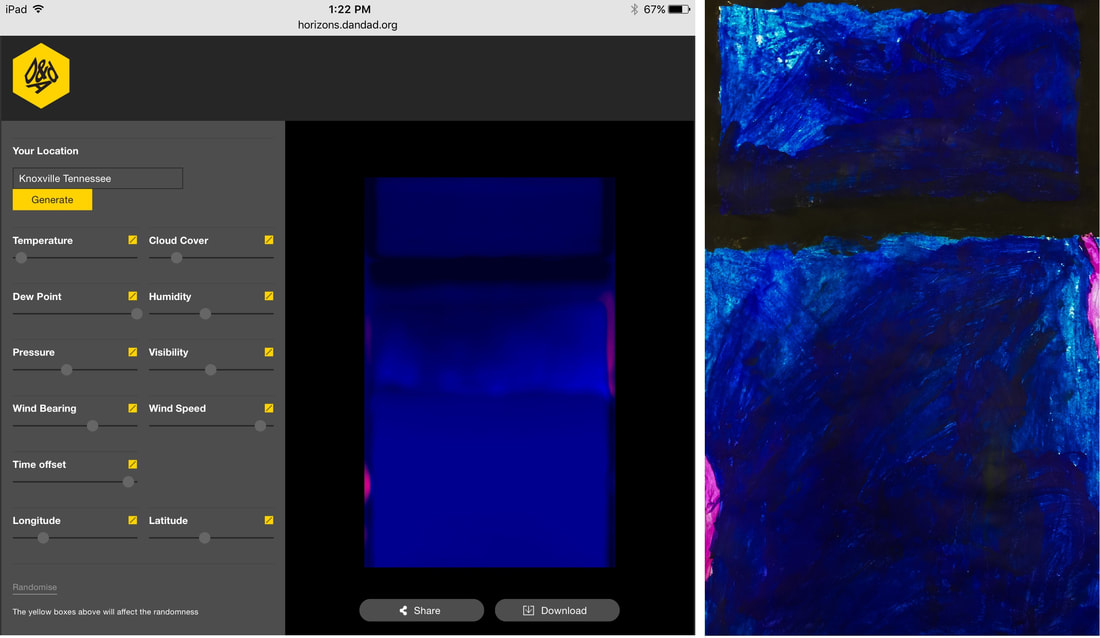  Here are a couple of links to better information about Fleur Isbell and her work- these articles do a much better job explaining the science and technology that her work involves. Colors That Connect the World Graphic Design: Rising Star Fleur Isbell  This was a really fun activity for third grade students! The goal of this lesson was for students to experiment with some unusual art-making materials and to notice the unique characteristics of each. We tried to focus on the changes that occurred with each type of material, since "Change" is the main concept of their current IB unit. I set up each table in the art room with a different type of material, or media- our vocabulary word for the day. Students rotated between the stations so that every student got to explore all the materials. For some stations I gave guidance on how to best use the materials, and for other stations it was all about exploration. By the end of the two-day activity, students had explored multiple new ways to make art! The last part of each rotation was for students to make notes about the characteristics of each material and reflect on the changes they observed. At the end of the class, we combined our observations into a group list.  Here are the materials we explored: Ice Paint- Liquid watercolor frozen in an ice-cube tray, with a wooden pick inside to make a handle.  Student observations:
Puffy paint: made with shaving cream, white liquid glue, and a bit of tempera paint.  Student observations:
Watercolor and salt: Coarse salt sprinkled over very-wet watercolor paint.  Student observations:
Baking soda and vinegar paint: I mixed a box of baking soda with several packets of powdered drink mix, and put the mixture in salt shakers. Students sprinkled a layer of powder on their papers and then dripped vinegar on top.  Student observations:
Bubble prints: A mixture of water, dish soap, and tempera paint. The students blew bubbles with a straw and then laid their paper on top of the bubbles to capture a print.   Student observations:
Oil pastel and watercolor resist: Students made marks with a white oil pastel, then painted over them with watercolor to make the lines appear.  Student observations:
Texture tools: Students drizzled paint onto their papers and moved it around with a variety of utensils to create varying textures. 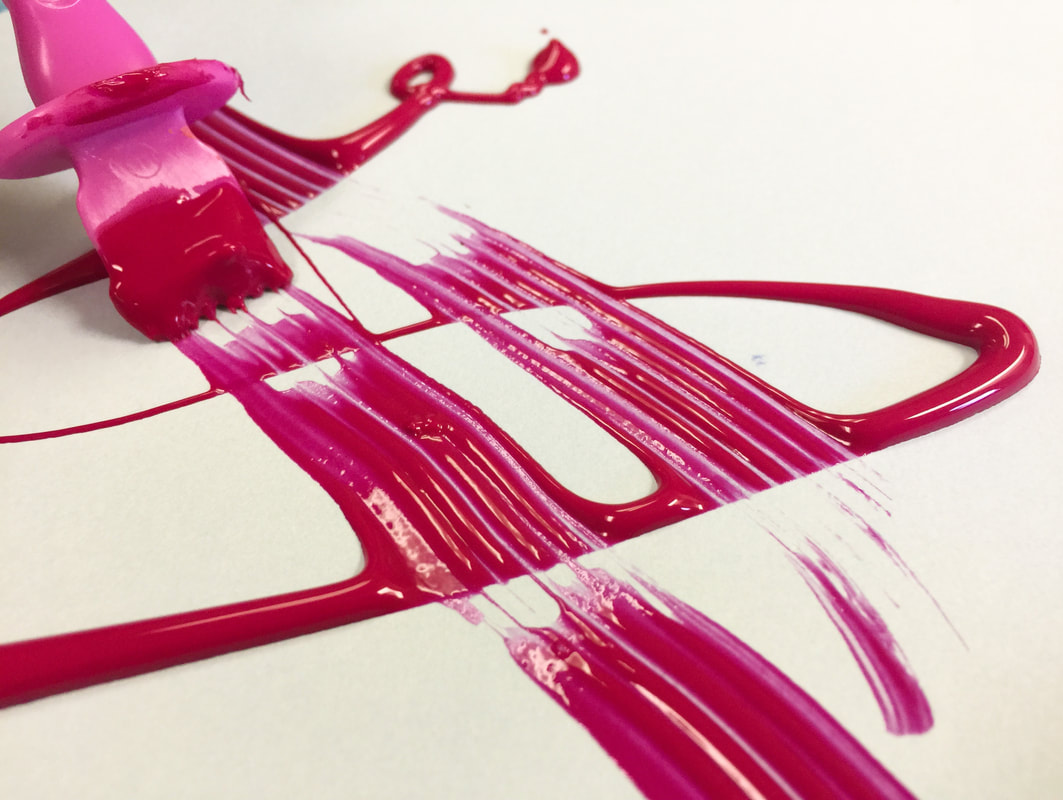 Student observations:
This was a really, really fun lesson, but a really, really messy one, too! It was definitely worth the mess. . . lots of good learning happened!   At the close of the lesson, I shared a few short videos with students. These videos all feature artists who really "think outside the box" as far as materials and techniques go! It was a fun way for students to visualize where this experimentation could eventually take them! This artist uses force and motion and gravity to use paint in a whole new way. This artwork is proof that you can make art out of ANYTHING. This is NOT a kind of art I ever want to try. Yuck!! These are the tiniest works of art you will ever see! This video was the kids' favorite. They begged me to let them try it someday. We might be able to do it on a smaller scale- we will see! This project for third graders was inspired by the book Looking Down by Steve Jenkins. It is a wordless picture book representing a view of the world from above. The first page shows Earth from very far away- it's just a tiny dot! Then we move closer and see the texture of the moon, then closer to see shapes of the continents. Then roads and cities appear along with bodies of water like rivers and streams. Each turn of the page brings the viewer in even closer. Eventually we see a young boy on the sidewalk in front of his house. The next page shows a magnifying glass in his hand. The final page is a detailed view of the ladybug he's studying so closely. Each illustration is created with beautifully textured collage artwork.       I chose this book to share with students because they are finishing up a unit on landforms- rivers, streams, islands, peninsulas, mountains, plateaus, and more. I asked the kids to list them all for me and they went on and on! I wanted them to understand how these landforms are represented on a map, and that we look at them from an aerial perspective- as if we're looking down from outer space. Each student (or pair of students) chose an image I printed out from Google Earth. They used collage techniques, similar to those in the book, to recreate the landforms in the image. Their goal was to represent the shapes and textures as accurately as possible.              This was a one-day version of a similar project we did last year- the previous version involved painting and took about five class periods to complete. We just didn't have that much time this year! In our next art session, I'm planning to show students these artworks by sculptor Laura Moriarty. Her work connects really well to students' current learning about how the mountains and valleys of the earth are formed. We didn't have enough time this week, so I'll be sure to squeeze it in next time! Moriarty's wax sculptures are inspired by the folding and buckling and layering of the earth's surface. They are gorgeous!!   Here's a video of the artist at work- the way she folds and layers the wax is designed to mimic the way the earth folds in on itself to create layers of rock.  Welcome back to school! It has been a great first few weeks. Very busy, but great! We started the year with a solar eclipse-themed artwork, to celebrate the "Great American Eclipse" that passed over us on August 21st. We started by looking at some artworks inspired by previous eclipses. We discussed how each artist interpreted the eclipse in a unique way and with a variety of materials.  Representing an eclipse through a pen-and-ink drawing.  And a painting.  With stained glass.  Wood-working techniques.  And quilting! Students then created their own interpretation of the eclipse using a chalk pastel technique. Here are our "Solar Eclipse Silhouettes"!             I love the detail this student added- a drawing of himself wearing his eclipse glasses!!
I wanted to share the beautiful butterflies kindergartners have just finished! This is our last project for the year, and it supports K5's current science unit on life cycles and how animals grow and change in different ways. The kids have already learned about the butterfly's life cycle with their classroom teachers, so we started by looking at some examples of butterfly wing patterns and coloring. We talked about what symmetry means and examined how a butterfly's wings are exactly the same on both sides.  To create their own butterflies, students started by tracing half of a butterfly shape on one side of their papers. If our time hadn't been so short, I would have had students draw their own wings, but I needed the lesson to fit in the two weeks I had left with kids and tracing the beginning step is an easy way to make that happen. 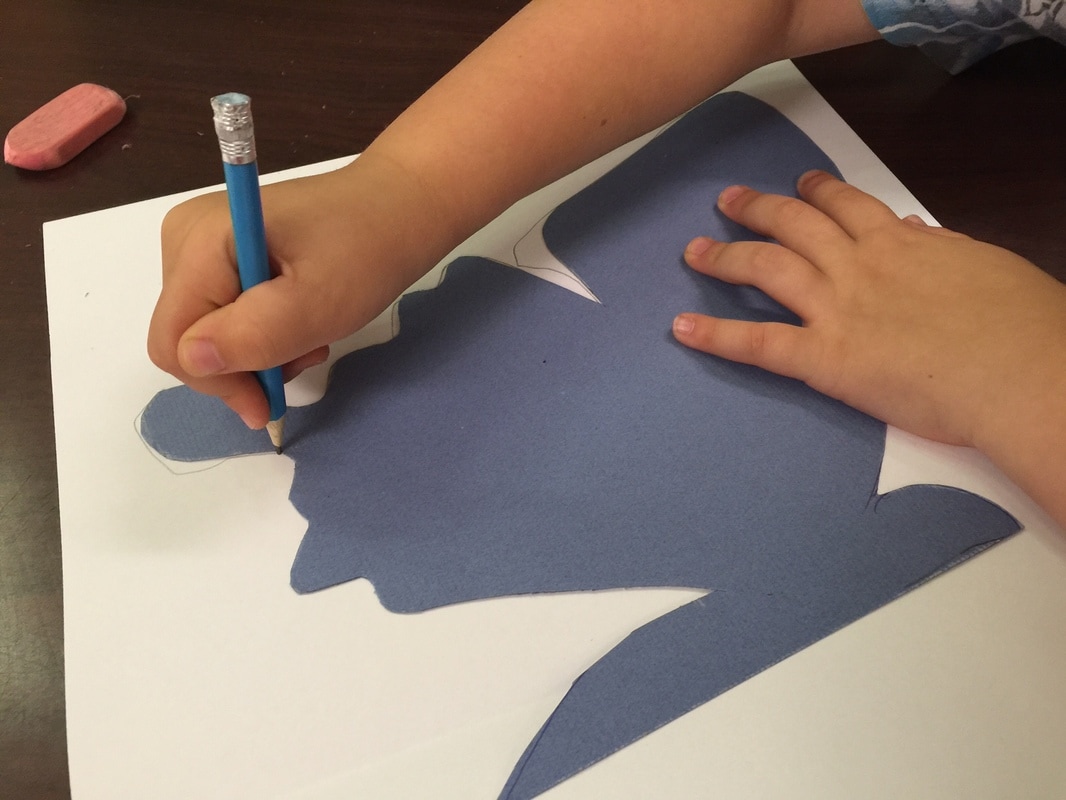 Next, students used pencils to sketch some simple shapes inside their butterfly's wings. Then came the messy part! Students traced over their pencil lines using liquid glue that I tinted black. This was a real challenge for most kindergartners- most of them had never dispensed glue from a bottle before, and learning to squeeze just the right amount is tricky!   After all the glue was applied, the next step was to fold the paper and rub gently to transfer the design to the other side. This is how we created symmetry!  Then students gently peeled the two sides apart to reveal the finished butterfly design!    When students returned the next week, it was time to paint! Each student chose two compatible colors to paint their butterfly.   And here are some of the finished butterflies! My plan is to keep these paintings over the summer, and then display them at the beginning of the new school year.           The timing of this project coincides with 3rd grade's focus on animals. When we started, classes had just visited the aquarium and got to see some interesting animals in real life! With that trip fresh in their minds, students began this drawing project. Our inspiration came from this example- it was made by a high school senior, so it really set the bar high for our 3rd graders! But I knew they could do it!  The students requested the species of animal they wanted to draw, and I found photographs for them. Then they had to make four separate drawings of that animal- one had to show the whole animal, and the others were to "zoom in" on some of that animal's characteristics. They were to especially focus on the animal's physical adaptations- camouflage patterns, scales, claws, webbed feet, etc. Here are some of the results!          This week's lesson finishes up our work with plants. See the other projects here and here! Students practiced being "scientific illustrators." These people are artists who are also scientists! Scientific illustrators are the people who draw diagrams in science textbooks, medical journals, and other informational texts. They help us understand how the world works! In today's activity, students needed to focus as much on looking as they did on drawing. I wanted them to forget every other flower drawing they had ever made, and instead, to really SEE the flower or plant that was in front of them. I wanted the students to look with fresh eyes and notice every single detail. Students chose several plants to study, and we used last week's eco-prints as our backgrounds. The drawings turned out amazing, and it's obvious that the kids were looking closely at details!      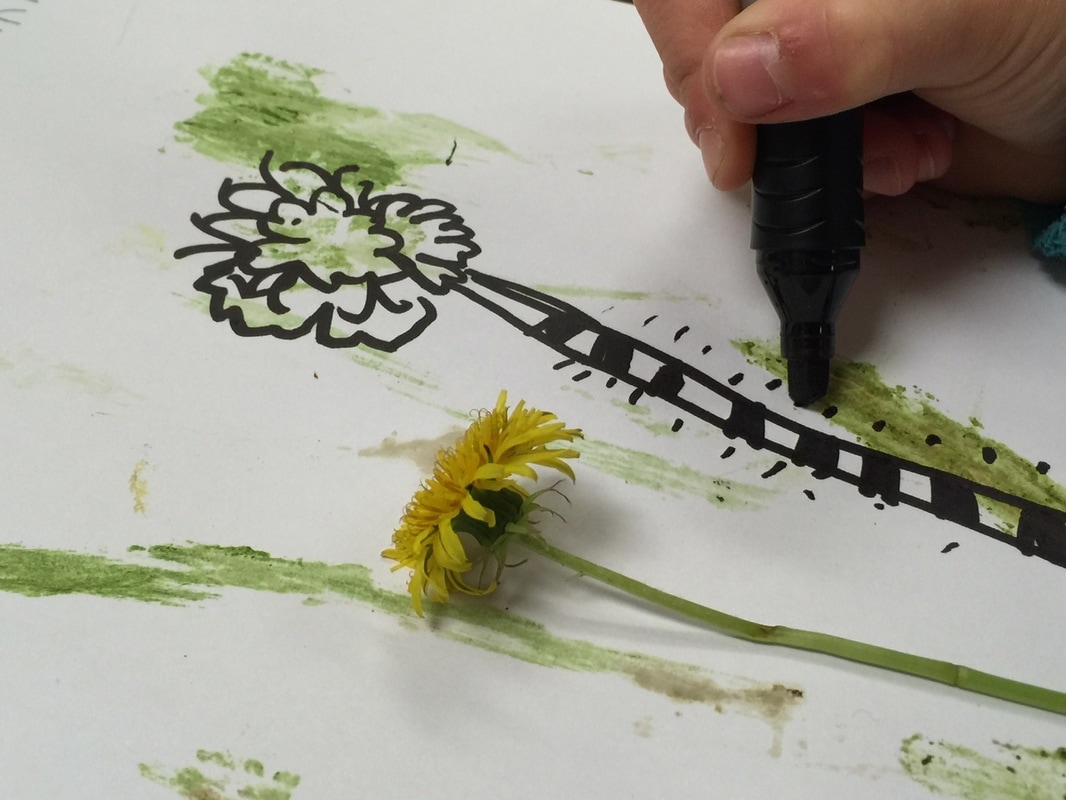   This is the second week of first grade's exploration of art-making with plants. Today, we went outside and used the green chlorophyll in plants to do a print-making activity called an eco-print. Students chose a variety of plants and layered them under a piece of parchment paper. Then they used a craft stick to rub the plant and transfer the green chlorophyll, resulting in an impression of the plant! We will use these eco-prints as the backgrounds for a detailed plant drawing next week.          |
Archives
March 2018
Categories
All
|
 RSS Feed
