|
Each year, the Gifted Art group at Hendrix collaborates to create a book. This year's book is the fourth in the series. It's titled The Rainbow Brush, and is styled after Marcus Pfister's The Rainbow Fish.  The book tells the story of a not-very-nice paintbrush who is fortunate to be more colorful than the other brushes- similar to the Rainbow Fish's colorful scales in the original story. Throughout our story, the Rainbow Brush learns the value of sharing, and comes to understand what it means to be a true friend. Please enjoy this digital version of our book! Our book The Rainbow Brush joins three previous collaborations:   
0 Comments
This was a quick and fun project for my Gifted Art kids. The first step of the project involved them painting marks inspired by prompts I called out to them. The prompts were purposefully vague... to give an example, one prompt was "draw five circles." But I didn't specify how big the circles had to be, or if they all had to be the same size, or if they could overlap, or if they could be painted in solid! When students asked those clarifying questions, all I did was repeat the prompt. I did it this way to force the kids to make those decisions for themselves. I wanted the kids to understand that in this particular painting there really wasn't a way to do it "wrong" and that any of the marks they chose to make would be fine! This particular group of students is often very hard on themselves and very afraid to make mistakes. I chose this painting method to encourage them to let go of some of that fear and build their confidence in their own artistic decisions. After completing the mark-making with black paint, students chose a few colors of liquid watercolor to paint the remaining areas of the paper.   The next step was to cut the paintings apart! I told my kids at the beginning that we would eventually be cutting their paintings into pieces, so they needed to not get too attached to their work. This was hard for some of them!  The final step was to rearrange the painted squares into an interesting composition. Then we glued the squares on black paper, leaving a little space between the squares.   These "reassembled paintings" turned out very successfully!      This project was inspired by the work of illustrator Daniel Mackie. His work features very detailed watercolor paintings of animals. Parts of the animals are very realistic, while other parts are painted using a combination of decorative patterns mixed with illustrations of the animal's habitat. Here's an example:  Notice how this lion's head, paws, and tail are very realistic. Inside the lion's body, we see clues about where he lives- an African grassland. We also notice some decorative elements like the pink and blue designs above the lion's paws. We can see similar designs in the mane and tail. I actually was able to purchase some prints from the official Daniel Mackie shop! They came all the way from the United Kingdom! My students loved having these artworks in their hands. They are still grasping the difference between an original work and a print, so this was a good opportunity to explain a little about how the commercial art world works, and the value of an original painting compared to a print. 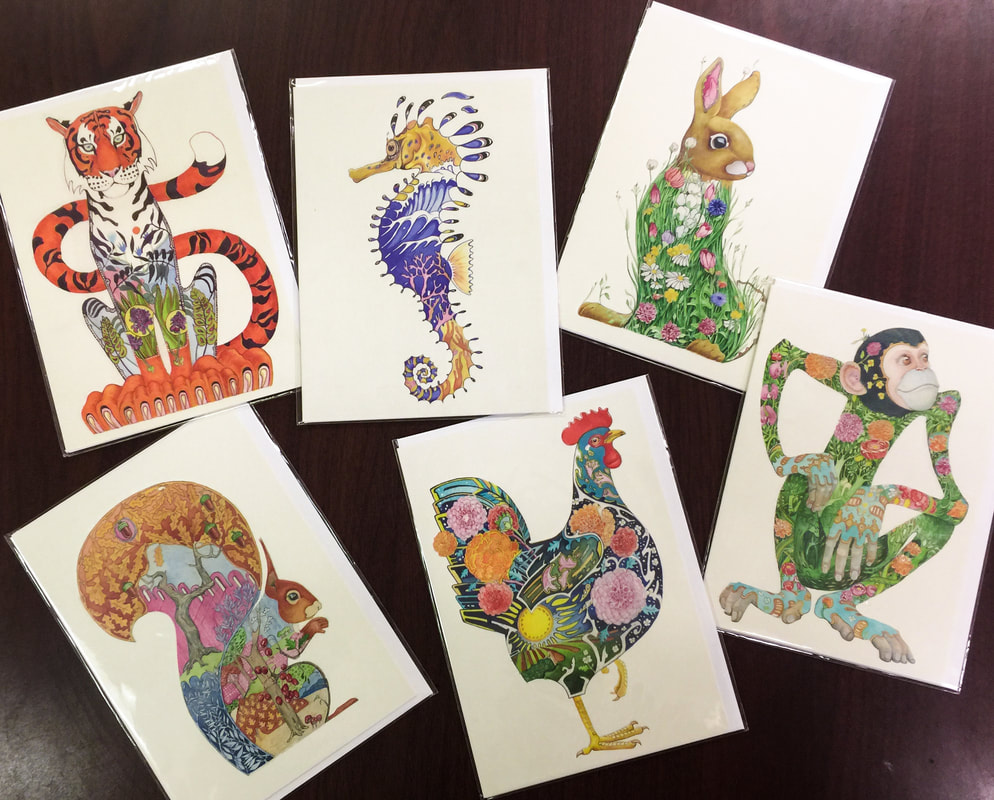  Click here to read a statement from Daniel Mackie describing some of his influences, his creative process, and how his style has changed through the years. My students also loved seeing the examples of his in-progress works! Here are some of the works my students created using Daniel Mackie's works as inspiration. They did use a pre-drawn outline, but all the interior designs are theirs. I think they did an incredible job!          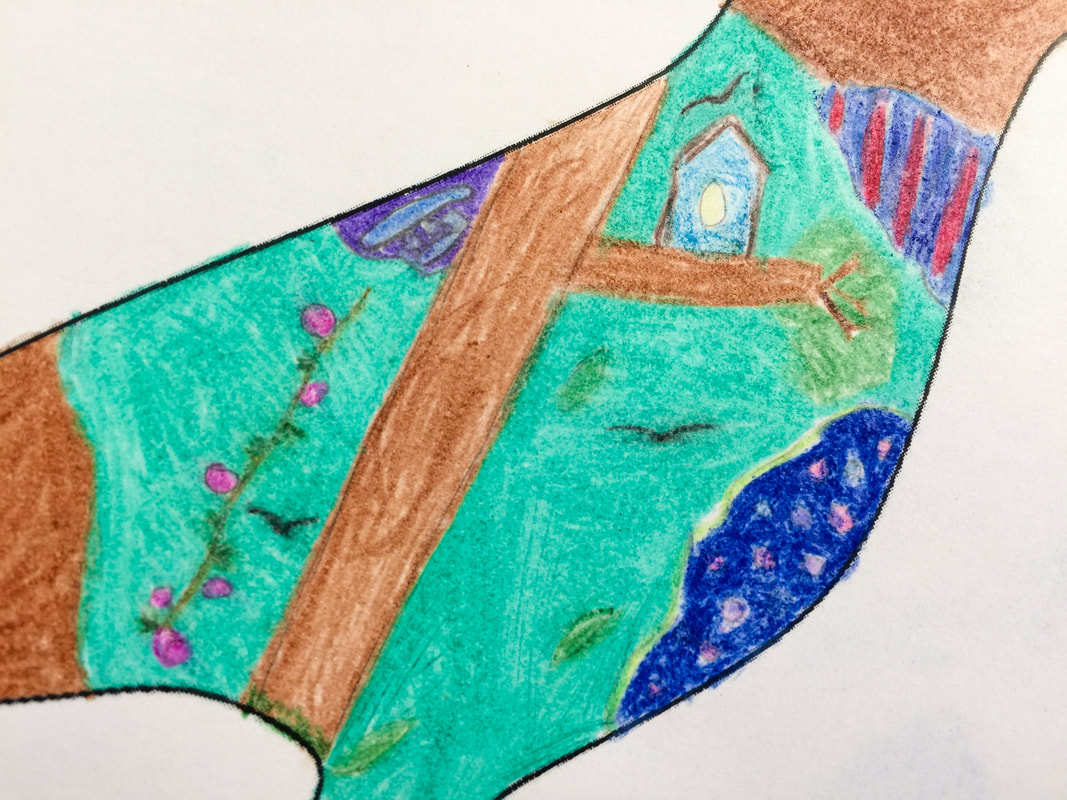          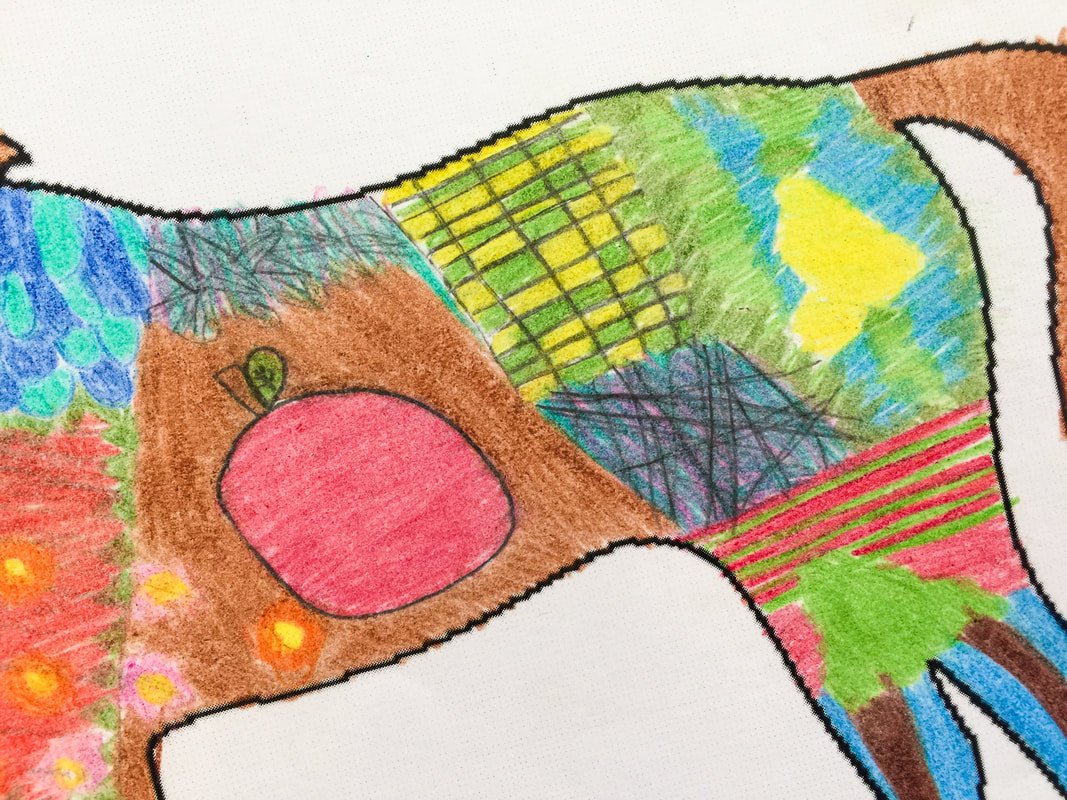   My kids were quite interested in Daniel Mackie, since he is a contemporary artist who is currently producing art. Many times, the master artists we look at are from many years past and sometimes students have a hard time connecting with their work. I love sharing contemporary art with my students in addition to the masters from the past. We decided to email Daniel Mackie to ask a few questions, and he was kind enough to respond!! Here is the email we wrote as a group: Dear Mr. Mackie, We are an Art Club in Spartanburg, South Carolina, in the United States. We are in the 4th grade, so most of us are 9 years old. We looked at your animal drawings and thought they were inspiring. So we decided to make some of our own! You can see our drawings on our teacher’s blog. We loved that they had the habitats inside them, since we study habitats in school. We loved how you put the information inside. We liked the patterns that you used. We had a few questions for you about how you make your art. If you have time to write us back, we would be excited to hear from you!
Thank you for inspiring us and giving us good ideas. We appreciate you and the time you put into making art for us to enjoy. Please let us know if you like our drawings! We worked very hard! Thank you, Ms. McGee’s Gifted Art Club Ava, Irina, Chloe, Kyndall, Graham, Titus, Echo, Addyson, Jacqueline, Sonya, Luke, Nelissa, Anacelia, Winston, Destiny, Vanessa, Kamiyah, Ruby, and Rachel. And here is the very kind response we received! I so appreciate Mr. Mackie taking time to write back to my kids and encourage them. They will remember this experience for a long time! Awesome Work! I like the T rex! I am doing one of those at the moment! So to answer your questions... Usually one painting takes about a week, some take longer, the ones with grass and flowers take ages. I use watercolour, so have to be very considerate when I start painting. The crucial thing is to get the drawing right first before I start painting. When I do start the painting the general rule is, start with light colours and put in the deep reds and dark colours right at the end. Most mistakes can be remedied, but sometimes the whole thing has to go in the bin. My favourite is usually the one I am working on. Would you mind if use a couple of your pic's on my blog and link to your blog? Hope that helps All the best Daniel This was actually one of the first projects I did with Art Club back in the fall, but I never posted about it on this blog. They learned so much from this project, and it's definitely one I'll do again!  The objective behind this lesson was to introduce my kids to the grid drawing method. This technique is one students wouldn't typically experience until middle school, but this group of artists was ready for it. The grid method is simply a way to enlarge shapes into a bigger version while using grid lines as a point of reference. Each student had a small card that had been gridded into 1" squares, and they arranged a selection of candy on the card. They drew the candy onto a much larger piece of paper that had similar gridded markings. By making the larger squares match the smaller squares, the students created an enlarged version of their candy still life. This method was a completely new technique for my students, so we started with these worksheets to help them grasp the concept of taking one square at a time, enlarging it, and making it match up with the next square.   Applying these skills to a real-life drawing was a very challenging task! I am so incredibly proud of how their drawings turned out. This experience really helped my kids learn to "see" like artists, and learn how to visually analyze a still life and recreate it accurately. This task really helped prepare them for the drawing challenges they would see later in the year!   Here are a few of the finished drawings. Remember, these are from the beginning of the school year. I wish we had time to do this project again now- it would be a great way to show their growth as artists. I know they could do even more amazing work now!       It's become a tradition for each year's Art Club to create a book. This year our book is titled Brown Crayon, Brown Crayon, What Will You Make? It's written and illustrated in the style of the classic Brown Bear, Brown, Bear, What Do You See? The text is written in a similar pattern as the original, and the illustrations are created using a similar method- by painting textured papers and then collaging them into a scene.  Our inspiration, and our own version! Each art club member chose a crayon color, and planned and created the illustration. I helped some with the text, since it was tricky to get the right rhyming pattern and the correct number of syllables. The book is the result of about six weeks of hard work! A hardcover copy is now in our school library. We finished the book around the middle of the year, but didn't make this video until recently. I know you'll enjoy it! (the video may need to load completely before it will play.) Brown Crayon, Brown Crayon is the third in our series of Art Club books. It joins Goodnight Art Room (inspired by Margaret Wise Brown's Goodnight Moon) and If You Give An Artist a Pencil (based on If You Give a Mouse a Cookie by Laura Numeroff).   The school year is winding down, and it's the time of year when we can do some "just-for-fun" projects. Art Club's latest work definitely falls into that category! In our next-to-the-last meeting, I showed my kids how to marble paper using shaving cream and liquid paint. Our original inspiration for this project came from the Japanese craft of suminagashi- a method of marbling paper using water and special inks. The craft dates back thousands of years, and the name means "floating ink". Students loved looking at examples of the intricate designs. We even found a video demonstrating the process!  examples of traditional suminagashi Here's the method we used: Each student spread a layer of shaving cream in a tray. It's important to use the foamy white shaving cream, not the gel kind. We used plastic cards to scrape and smooth the surface, just like spreading frosting on a cake.  Next we dripped liquid watercolor paint onto the surface. If you want to do this at home, food coloring would make a good substitute.   We used the end of a paintbrush to carefully swirl the colors, being sure to keep the color on the surface instead of mixing it all the way through the shaving cream.  Next, carefully lay a sheet of paper on top of the design. Lightly tap your fingers over the surface to be sure no air bubbles are trapped inside. Give the paper a few seconds to soak up the paint.  Then grab a corner of the paper and pull it back. Some of the shaving cream will stick to the paper, and it will look like a foamy mess, but that's okay!  The final step is to use a plastic card to scrape away the leftover foam. Then the design will show through!  You can use the same tray of shaving cream multiple times, until it starts to look dirty. Just use the plastic card to smooth the surface between prints. The papers will dry in a few minutes, and can then be used for all sorts of art projects! Beautiful cards, gift tags, origami designs... anything you can think of!  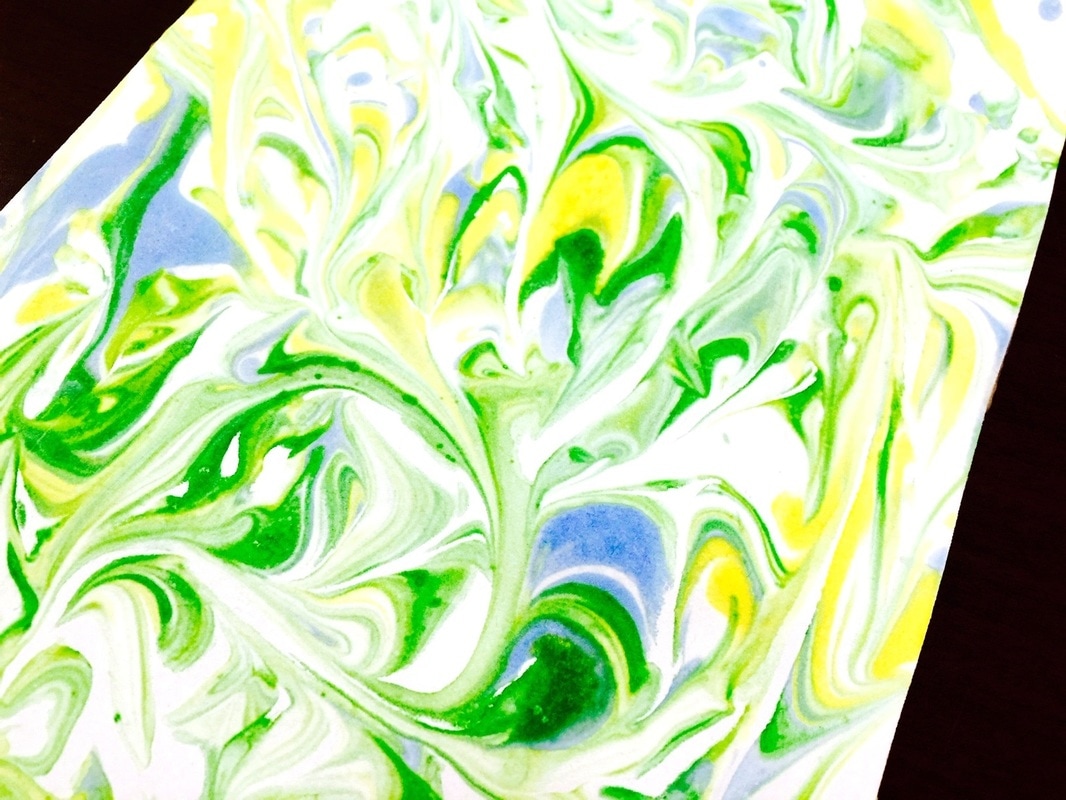    Art Club had a shortened meeting this week, so we had just enough time for this quick drawing exercise. First we watched this speed-drawing video of someone drawing a spoon, then I challenged my kids to do the same! I gave them gray-toned paper, which served as the mid-tones of the drawing. They had charcoal and white colored pencil to add the dark and light values. I wish we'd had longer than thirty minutes so the drawings could have been even more incredible!       Art Club continued developing their basic drawing skills through sketching these geometric forms. Each student arranged their own variety of forms and then drew them as accurately as possible. I encouraged them to pay attention to lines and angles as well as where the shapes touched.  Here is an example of a student's view. After sketching the forms, students then had to add value to their drawings to show the shadows and highlights. Finally, they made a second drawing, this time in color. The students did a beautiful job, and I continue to be amazed by their growth as artists!         I was so thrilled with the work Art Club students did on last week's paper curl drawings, and this week I wanted to challenge them with something even more advanced. This activity builds on the work with value and shading that we've done all year. Instead of shading a simple form though, the students had to observe and replicate the shading of folds of cloth. For most students, this was their first time experimenting with charcoal, which is an added challenge. This is really a high-school level drawing activity! In fact, I even had to do a project on drawing cloth when I was getting my art degree in college! So the fact that fourth grade students could begin to have success with this is very impressive. They still have lots of room to grow, but I am very proud of their beginning attempts.         I love challenging my Art Club members with observational drawing projects. It fascinates me that these students are only 9 and 10 years old, yet some of them have better understanding of space and form than many adults! The task that I gave them this week was very difficult, yet they EXCELLED. We looked at the artwork of contemporary artist L.C. Neill. She has a series of paintings featuring ribbons with very dramatic lighting.  Here's an example- "Silver and Copper" by LC Neill. We made our own version by curling strips of paper and then observing the light and shadows. I am SO PROUD of the results!         |
Archives
March 2018
Categories
All
|
 RSS Feed
