|
To support their current IB unit, first grade artists got to design their own money! First we looked at the design on our American money. We looked at the symbols and what they each represented, and talked about the important and respected leaders that are pictured. We watched this video explaining how money is made: Next we looked at some money from other places. We compared the symbols pictured on their money to the images represented on ours. Some of the money had buildings on it, some had people, and some had animals! We decided that when a country chooses what designs to put on their money, they are communicating what they think is important and what they consider valuable. 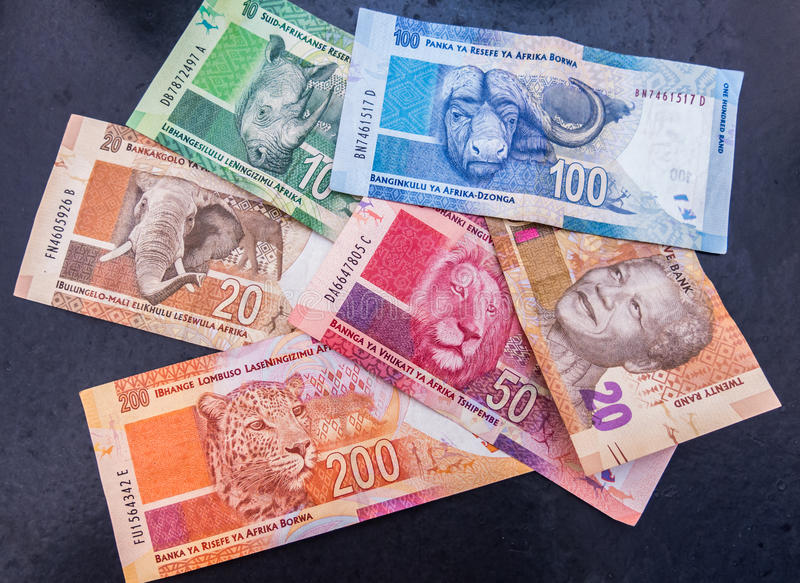 South Africa's money  Australia's money  Indonesia's money  Malaysia's money  Papua New Guinea's money Next, students designed their own money! They could use a place that really existed, or they could make up their own land. The example I drew for them was for South Carolina money, and the symbols I chose were a palmetto tree, peaches, the beach, and the mountains. Students loved coming up with their own ideas! Here are just a few examples:    
0 Comments
One of the things I like most about teaching art is using it to teach real-life skills. Art teaches kids how to make a plan and follow it, how to take a mistake and turn it into something good, how to be determined and see something through until the end... and lots of other good things! One real-life situation I wanted my kids to experience was having to work within a budget. Second graders are in the middle of an IB unit with economic themes- topics like good and services, and how supply and demand are related. To support this learning, I made my art students pretend to buy the supplies they wanted to use! But first, they had to earn some "money". During their last project, I passed out plastic gold coins as rewards for any good thing I saw students doing. They earned coins for things like staying on task, following directions the first time, and helping with clean-up procedures. I made sure everybody earned at least a few coins, and most students ended up with about ten. Several students had fifteen or more coins! At the end of that day, students turned their earned "money" back into me and I wrote down their total. We compared this to putting money in the bank- it's still your money, you're just letting someone else hold it.  This week, they got to "spend" their money at our pretend Art Supply Store. I gave each student back the number of coins that they had earned, and they could use them to purchase anything they wanted. I tried to offer some unusual or special items that they don't normally have access to- like glitter crayons, colorful paper, metallic markers, neon oil pastels, yarn, buttons, beads... along with the typical scissors, glue, markers, colored pencils, paint, etc. To make the math easy, each item cost one coin.   But first, I had students make a plan and write a shopping list. I had them write their total number of coins at the top, and then number that many lines down. They needed to think about the project they had in mind and carefully plan what they needed. I wanted them to avoid spending all their money on glitter crayons, only to realize they forgot to buy paper to draw on! It was important for them to think all the way through their project and predict all of their needs. This is a hard skill, but an important one!    Of course, students ran into some problems. In one situation, there was no more red paint left and a student really wanted some. She learned she could barter with another student who wanted her gold sharpie, and they made a trade! In a different situation, a student wanted yellow paper, but there was only one piece and another student had already claimed it. The student offered his classmate TWO coins and was able to buy it from him! I wanted these types of problems to occur, so that students could explore some problem-solving skills. Students had complete freedom over what they made, so there were some interesting creations! Here is some of their work:                 This project is one that K5 students completed back before the winter break, but I'm just now getting around to sharing it. Their classroom lessons at the time involved understanding maps and how places are represented geographically, as well as learning about how communities function. In Art, we did a project inspired by the shape of South Carolina. I wanted students to be able to recognize our state's outline. I started the lesson by holding up a poster-board cut-out and asked students to identify the shape. I was surprised that not one single student got it on the first try, in any of our five classes! Their first answers were always a triangle or a heart. After I gave them a clue or two, eventually someone in each group was able to name it. Students started their artwork by tracing the shape onto colored paper.  The next task was to tear and glue tiny pieces of paper to fill the inside of the shape. We learned the vocabulary word "collage".  Students started by completing the outside edge first.   The other main objective for this lesson, in addition to recognizing the state's shape, was for students to be able to accurately judge shape and size. I wanted them to choose appropriately-sized pieces to fill their space. I told them it was like they were creating their own puzzle pieces. . . they had to look at the space on the paper and tear a piece that would fit perfectly in each little spot.  You can see that some kids were very careful to choose and place pieces with a lot of precision!  The tearing of the paper also helps develop fine motor skills and build strength in their hands. One student noticed that the paper he tore was already in the shape of South Carolina- he was so proud to show me!  It took two class sessions to get most of these finished, but by the end, students were very proud of their finished collages!  In the week between the first day of the lesson and the second, I asked students to be watching for the shape of our state in our community- on t-shirts, bumper stickers, and billboards. Many students came back ready to share the places where they had recognized South Carolina's shape!  As you might imagine, having this many tiny pieces of paper in our art room made for quite a mess. But kindergartners are great helpers, and with lots of little hands we were able to get the room back in order!    It was a successful project, and one that our kids really seemed to enjoy!.  Third grade students tackled a big subject in their latest project . . . Art as a method of bringing social change. We began by talking about some of the reasons artists make art- sometimes it's simply for enjoyment or to bring beauty to the world, but sometimes it's for a greater purpose, like to educate viewers about a topic or encourage them to think about something from a new perspective. Students were already familiar with the idea of an author writing for a specific purpose- such as to entertain, persuade, or inform- and were able to apply those concepts to art-making. I asked students to think about our society, and to choose something they didn't like about the world we live in. I offered a few ideas to get them started, such as bullying, pollution, or animals in need, but encouraged students to think of an issue that has affected their own lives. Their goal was to create an artwork that would communicate a message about their chosen topic and would inspire change in their viewer. This project was very student-driven. I offered students access to many different art supplies and encouraged them to choose what they were comfortable with and what would best communicate their ideas. Students could choose from paint, markers, colored pencils, white or colored paper, and various collage materials. Allowing the students this much choice really helps students to be invested in their work and committed to doing their best. Here are some of the finished projects. While the artworks are not as polished as I would like them to be, I think the message behind these works makes them each successful. Several students chose topics that were very personal to them. I was proud of them for being risk-takers and being willing to share their feelings!  "I am sad because there are kids that do not have friends. I wish kids would have friends and never be lonely. Some kids don’t have friends and that makes me sad. I wish kids were not lonely. I would like to help people that don’t have friends. I would like to change the world by giving everybody friends and nobody being mean."  "Please help the dogs. Help dogs that are homeless. Help them by giving them food and water. I drew a person giving food and water to a dog. We can help collect money and food for the animal shelter."  "My change is for my family to stop fighting. Then we will be a happy family. Then we will have a good life. My picture shows my family. We are being nice to each other in my painting. It shows hearts so you will see we are a happy family."  "We need to stop killing deers. Hunting is bad because it hurts the animals. We should keep the deers alive because they are beautiful and Santa needs the deers."  "The change I want to make is to change the world by being a teacher. I want to help children learn about math. My art has six children and a teacher and the children have notebooks open and they have pencils in their hands and there are chairs and desks and a board. Teachers are important because they help us learn."  "We need to stop oil in the ocean. Otters and beavers get stuck. They also get stuck in the soda holders. They choke and they can’t get out. People have to save them. My art shows an otter. There are blue tears on his face. The black oil is all around him."  "I want to see everyone accepting each other. I want to see new colors and people liking the new colors. I showed this because people need to change and love each other in life. We can change our ways in life and make better choices."  "My change is to make people not be on the road in a storm. You will get a message when a storm is about to happen and will get cover. People will all have homes and be protected and be safe."  "My change is to stop littering. My art shows if you don’t stop it this is what’s going to happen. Just look at it- there are no trees, there is nothing left because of littering. You should start now or later. If we do this everything will last forever. It will help Earth a lot."  "People should stop smoking. It is dangerous. It smells bad. It hurts our lungs. It makes us very sick. It makes your lungs black. You will have a crazy voice when you use a machine to talk." 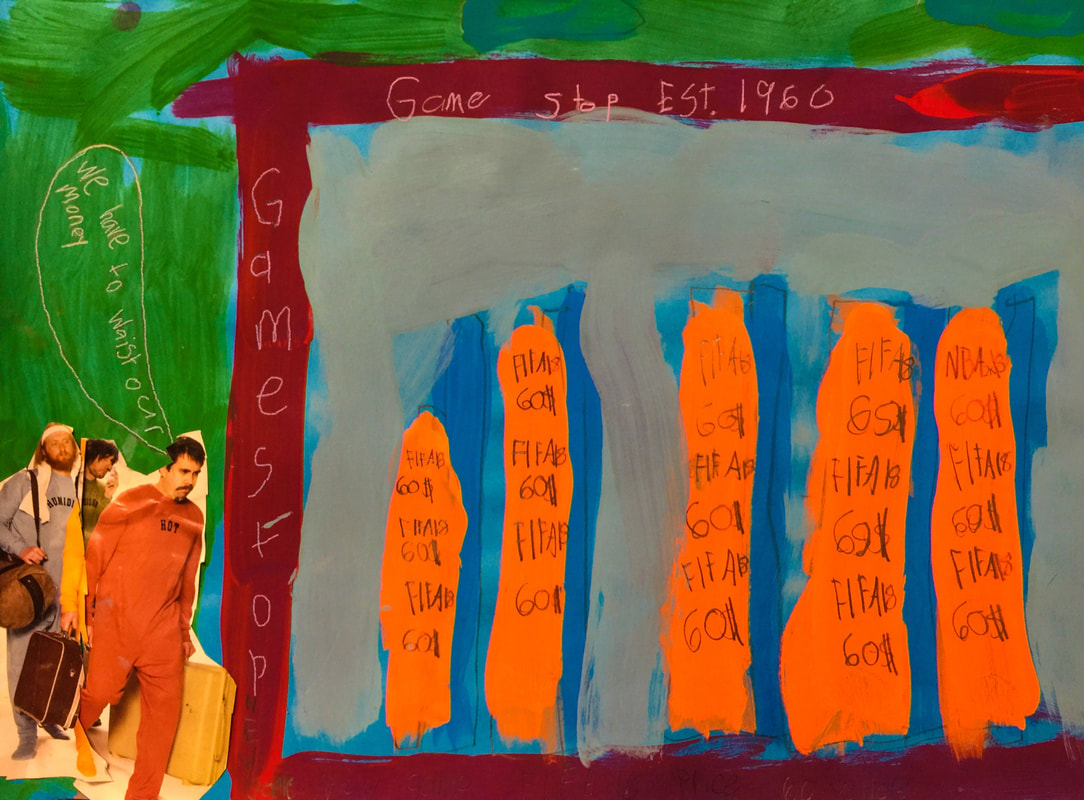 "My change is to make stuff not cost much money. Some people don’t have enough money to buy stuff. In my picture stuff costs $60. There are three men holding a suitcase and their faces are mad. We should tell the president to lower the prices. We can also tell the people that work at the stores."  "My change is to stop killing animals. I feel depressed when I see one die. My art shows a person killing a dog/cat. Then it shows two dogs eating. It says let them eat food too. It also says to donate money to animal shelters to start the change. You should spread the word to other people."  "I want people to stop drinking. I know people that drink. I don’t want them to get in trouble. My painting shows that my uncle died in a wreck with a tree. I know where he crashed. It is too late for him. But not too late for other people. This painting shows my mom. She is crying because my uncle died. The sign shows no drinking. I painted the tree and the crashed car."  "People are crashing cars and they die from the crashing. They don’t want to die. They crash because they don’t watch where they are going and they are on their phones and they don’t see where they are going. My change is for them to stop looking at their phones and look where they are driving." On the last day of the project, I introduced students to some master artists whose work addresses social issues. Typically I show other artworks at the start of a project; however this time I intentionally waited until students' work was well underway. I wanted them to think for themselves rather than copying imagery from another artist. Here are a few of the works we looked at:  Keith Haring: themes of love and peace Keith Haring began his art career by creating large chalk drawings that he displayed in subways cars in New York City. His work was seen by the many people riding the subway each day. His imagery often shows love and friendship. As his career grew, he began painting murals in buildings like schools and hospitals. His later work focused on raising money to find cures for illnesses.  Marisol Escobar: feminist issues This sculpture is a portrait of President Lyndon B. Johnson. The small figures he is holding in his hand appear to be birds; however, when you look closer you realize they have people's faces. They faces are those of his wife and two daughters. The bird shapes are a reference to his wife, Lady Bird. The contrast in size makes him seem very powerful, while the female figures seem less important- almost like pets. This artwork points out the unbalanced power between the male and the females.  Romare Bearden: celebrating African-American communities Romare Bearden was part of the Harlem Renaissance in New York City. Some of his most famous works are his collages featuring African-American neighborhoods. He wanted to celebrate the communities and give others a glimpse of what life was like. This image, which is part of a large artwork called The Block, shows a group of street musicians performing outside a barber shop.  Kerry James Marshall: civil rights Kerry James Marshall was a child in the 1960's, and grew up during the civil rights movement. His artwork celebrates the leaders of the time and the sacrifices they made. In this painting, a woman is creating a shrine to the leaders of the time. She is dressed all in black to symbolize mourning their loss, and is painted wearing wings like an angel.  Chris Jordan: waste, excess, and consumerism This artist is the most contemporary, and the one that students were most interested in. Chris Jordan creates digital collages representing all the things we waste every day. The above artwork is a copy of Seurat's painting Sunday Afternoon on the Island of La Grande Jatte- but when you look closer, you see it's made up of soda cans! He explains that this artwork is made of 106,000 cans- the amount the US uses every thirty seconds. The gallery on his website is quite interesting, and really puts into perspective the resources our country wastes. Here are his other works I showed to students: Building Blocks: representing the 1.2 million students who drop out of high school each year Car Keys: shows the 260,000 gallons of gasoline used by U.S. cars in one minute Plastic Bottles: the 2 million plastic drink bottles we use every fifteen minutes We finished up with this video featuring an artist from Uganda, "Mr. Art", and how he hopes to inspire change in his city of Kampala through his artwork. My kindergarten kids just finished these collaborative collage projects featuring communities. In years past when I've done this project, I made sure to model everything for them- how to create a road, how to put windows on a house, how to cut shapes for a tree, etc. This year I didn't do any of that- instead, students created everything completely independently! The end products don't look as polished, but I think the learning was much greater. I did give them some thin black strips to make roads, and I pre-cut some paper into building-sized squares. I also showed them how to cut the squares diagonally to make triangles for roofs. Everything else is all theirs! Students worked in teams of three to create these communities. They started by gluing down the roads, and then from there, they could add anything they wanted! I did display some photographs of things that could be found in communities- like buildings, playgrounds, stop lights, trees, and cars- just to give them somewhere to start.  If someone had walked in the art room in the middle of all of this, they would have thought it was complete chaos! It was really noisy, kids were constantly moving around the room to get supplies from different stations, and there were definitely disagreements among team members about the best way to do things- not to mention the thousands of scraps of paper scattered on the floor. But- if you looked a little closer, you saw lots of great things happening, too:
                  I need to explain my system for distributing glue. We use "glue sponges"- a damp kitchen sponge cut in half, with a puddle of white liquid glue in the middle. Kids use one finger to scoop up a bit of glue and spread it on the back of their paper, then they clean their finger off with the damp sides of the sponge. When kids need a refill, they can help themselves with this glue dispenser. It's just a liquid soap bottle that's been filled with white glue. I tell kids they can get three pumps at a time. Sometimes they have to get help from a friend, like in the above photo- it's hard to be coordinated enough to manage both holding the sponge and pushing the top when you're only five years old! Here are just a few of the finished collages. The kids kept referring to them as their "maps", even though I never used that word with them. That just goes to show how they are connecting their learning in the classroom to what we are doing in Art!       
I developed this lesson based on a conversation with one of our kindergarten teachers a couple of years ago. We were talking about their unit on communities, and how one aspect of that unit involved learning to read and create maps. The teacher said that her students often have a hard time grasping that maps are drawn from ABOVE- instead, students tend to draw maps as scenes, with all the buildings sitting beside each other. I knew there had to be a way I could teach that concept through Art. Over the last couple of years, I have tried several different activities to teach about a "bird's eye view" and never quite found the right lesson for our kids. But this year, I think I might have found it! I am interested to hear from our kindergarten teachers if they notice an improvement in student's understanding of map-making. I had three goals for this lesson:
This was a two-part lesson. The activity for both weeks was to paint a tree. In week 1, we painted a tree from BELOW. In week 2, we painted trees from ABOVE! I wanted students to notice the differences in how the trees looked and be able to represent each view with an artwork. PART ONE: To start off week 1's lesson, I showed the students Georgia O'Keeffe's painting The Lawrence Tree. I didn't tell them what the painting was- instead, I asked them to interpret what they saw. Some kids had really creative interpretations- "an octopus!" was an answer I heard more than once! Eventually we came to the conclusion that it was a tree. By asking guiding questions like "What's unusual about this tree?" and "How does this tree look different from the one we see outside the window?" I was able to get kids to verbalize that the artist was under the tree and looking up into the night sky.  Georgia O'Keeffe The Lawrence Tree 1929 The painting experience for this part of the lesson was a lot of fun. We got to go outside and enjoy the beautiful fall weather! We sat under a tree and looked up. First we talked about some of the things we noticed- especially the shape and width of the trunk. We talked about how it looks really thick and strong at the bottom, but as you look further up into the tree, the trunk looks thinner and far away. I showed them The Lawrence Tree again, and we noticed how the trunk made the shape of a triangle. We also talked about the branches and twigs, and how they get smaller and more delicate as you look further up into the tree. Then it was time to paint! I didn't give much instruction or do any modeling of how to paint the tree; instead, I wanted students to create their own interpretation. Many of the kids really had a strong grasp of the concept, while others were not quite ready for it yet.      Next we came back inside and added some green leaves to complete our view of a tree from underneath.    We ended the day with a look at Tana Hoban's book Look Up, Look Down. It's a wordless book full of photographs that ask the viewer to decide whether we are looking UP or looking DOWN at the image. It was the perfect transition into next week's lesson!      PART TWO: In the second lesson of this unit, we looked at trees from ABOVE! First I asked students to summarize what we did the previous week. Then I told the that this week we would be looking at the opposite view- instead of going underneath a tree, this time we were going to go UP!  I told them we were going to pretend to go up in the sky on a hot air balloon. We watched this video to see what it would be like. I asked them to be sure to notice the trees and how they looked different depending on how high the balloon was. Then I gave each student an aerial photograph, similar to the scenes we saw in the video. I asked them to paint what they saw- focusing on realistic shapes and details. We talked about how the trees looked- why didn't we see any of the trunks? Then each student began working on their painting, representing the photo to the best of their ability.     As in the previous painting activity, some students had a clear understanding and it was evident in their work. Several students weren't quite ready to grasp this concept, and we will revisit it again. I am hoping that with some more intensive instruction from their teachers in the upcoming unit, that it will finally "click" for them! Here are some of the finished paintings, paired with the reference photo the student used.      I want to share two more books I was able to use in this unit. The first is Looking Down by Steve Jenkins- one of my favorite illustrators. This wordless picture book is made of cut-paper illustrations showing our world from varying distances. Each page takes us closer and closer (or further and further, depending on whether you start at the front or the back.) For this lesson, I shared the book beginning at the back- we started with this close-up view of a ladybug. Each page takes you higher to see more and more of the picture. The scenes where you can see the whole neighborhood were helpful when I talked about maps with the students.                Below is a link to a video read-aloud of the last book I shared. This is They All Saw a Cat by Brenden Wenzel. This book was recommended to me by another art teacher. It's a great visual representation of perspective- how we each see things from a unique point-of-view. Second graders are finishing up an IB unit called "Kids.gov". This unit deals with leadership and how a leader's decisions impact the citizens and the community. The students learn about the responsibilities of leaders and the rights of citizens. In the Art room, we talked about how artists form a community of their own. People who love and appreciate Art have a responsibility to inform others about why Art is important in a society. We learned that this is called being an advocate for the Arts. To begin our lesson, I asked the kids to imagine what our world would be like if Art didn't exist. This video really brought that idea to life - Our students were amazed to realize just how much Art is present in everything we do. From the fashion designers who make our clothing, the architects who design our structures, the product designers who make machines and equipment, the interior designers who create the spaces we live in, the packaging designers and graphic artists who design the things we purchase, and even the media artists who create our entertainment, Art is EVERYWHERE!! I asked students to think of something that happens in their daily life. I asked them to illustrate that activity in two ways- one WITH the influence of Art, and one WITHOUT.     Students had the opportunity to share their ideas with their classmates.   While the first part of the lesson was designed to increase appreciation for the Arts, the second part was geared towards teaching advocacy. Now that students understood WHY Art is important, I wanted them to feel the responsibility for sharing that importance with others. This was the connection to the IB unit- as members of the art-making community, we have the responsibility to help others see why Art is needed in our society. This is advocacy! I shared with our students that there are children all over the country, and even in our own state, who don't get to go to Art class in their schools. Our kids were so sad to hear that! One second-grader even asked if it was because they didn't have art supplies- he volunteered to donate his extra crayons from home! (THIS is the kind of action we want to see in our students!!) I told them that in these situations, the leaders of the schools probably felt that it was important to put the school's money towards other things- likely reading and math. Students were thankful that we live in a part of the state where our leaders see the value of including the Arts in educating our kids! Our second activity was to make these mini-posters stating why Art is important. (These small artworks are actually called Artist Trading Cards, a new activity we are starting here at Hendrix. A separate post on these "ATCs" is coming soon!) Students were to design a card and then trade it with a friend. When trading the cards, they were to tell one reason they felt Art was important for kids. In having these conversations, students are being leaders in the Arts community and advocating for something they believe in!             Even the Art teacher made a card to trade!! If you're interested in more information about why advocating for the Arts in schools is a good thing, check out this video! Here's a link to one of my favorite articles encouraging Arts Education, and an infographic full of support for the Arts!  To enhance their study of Native American culture, third grade artists got to make their own Native American paintbrushes this week! Long ago, people had to use whatever resources were available to meet their needs. They had to make the tools that were needed to get the job done. Paintbrushes were one of those tools! To start, we looked at modern-day paintbrushes and learned some terminology:  Students had already studied Tomie DePaola's book The Legend of the Indian Paintbrush. It tells the story of a young boy named Little Gopher and his journey to capture the beautiful colors of a sunset. The book describes how Little Gopher makes paintbrushes from animal hair and bone, and stretches buckskins for painting surfaces.   I asked students to create their own paintbrushes from natural materials like Little Gopher did in the story. Each brush needed to have a handle, bristles, and a ferrule- the part that attaches the bristles to the handle. I provided a few supplies- rubber bands and tape- but the method of construction was up to each student.       The next step was to actually try painting with these brushes! Each student used bright colors of paint to try to replicate Little Gopher's sunset painting.    We had just enough time left to do a little reflecting on these hand-crafted paintbrushes compared to modern-day brushes. Most students were thankful we live in a time where we can buy the things we need instead of having to make them!  "This was an awesome experience but I would rather be here because I could not live a day there. I love being creative but that's too much. It's easier being here. I love doing that kind of stuff but I'd rather do it here."  "In the old days people had to make paintbrushes. In the now days people buy paintbrushes from stores. I would buy a paintbrush. People don't make paintbrushes in the now days. They don't want to make paintbrushes. "  "It was so cool to build a paintbrush by myself. I am very glad I had the materials to build it. It was a fun experience, though I am glad I live in the time I am in." To further compare paintbrush-crafting methods of then and now, we finished up with this "How It's Made" clip of a modern-day paintbrush factory! Last year's group of third graders had a similar experience with making paintbrushes- click here to see examples! This activity is loosely tied to 1st grade's current focus on communities. Students are learning that in order for a community to function, its members must work together. Everyone must do their part, and people must be willing to share the responsibilities! And that is what I asked our kids to do with this project- they had to function as a team, kind of like a mini-community, in order to accomplish a task. They had to share their ideas, listen to others, and make compromises in order to meet their goal of creating a collaborative piece of art. Each team had a bucket containing the same supplies- pipe cleaners, popsicle sticks, newspaper, aluminum foil, and clear tape. They could make ANYTHING they could dream up- but, everyone in the team had to be on board with the idea and everyone had to participate equally.  For the first half of our class time, I had them work without any assistance or guidance from me. I wanted students to experience the inevitable problems, and to have to find solutions independently- I think this is one of the most important skills students can learn from making art.   After about 20 minutes of work, I had students leave their in-progress creations and gather back as a group to discuss the process so far. I asked them to share what problems their teams had encountered and what they had done to get back on track. One team shared that they had run out of tape, but they figured out how to wire pieces together with the pipe cleaners instead. Another team had a disagreement on what to make- one member wanted a princess while another member wanted animals for a zoo- I'll share their creative solution later! With some guidance, students have been able to verbalize how working on this group project was kind of like being part of a community- that you had to help each other and make sure everyone had what they needed. That was my goal for the lesson! After the discussions, teams had a few more minutes to finish their projects. We ended the lesson with an opportunity for each team to share what they made! Here are some of their very interesting creations--  A sled with two people wearing coats and scarves.  A mama snake with her egg in a nest.  I love this one!! It's a lightbulb- see the swirly yellow to show that it's glowing? And the silver ball at the bottom is the chain that you pull to turn the light on and off!  This is a monster- see the eyes made from tape dispensers? The black pipe cleaners are laser beams shooting from the eyes!  This is the beginnings of a city scene- can you see the red stoplight? And the car in the parking lot?  This was the solution to the princess-or-zoo question... In this scene, Rapunzel is being chased up her tower by a gorilla! But the prince is on his way to rescue her!! What a good compromise!  This is a solar eclipse! The shape on the right is the sun- see how the popsicle sticks make rays of sunlight? And the orange pipe cleaners are the sun glowing around the shadow. And the creation on the left is a pair of eclipse glasses!! I LOVED watching our kids work through this project- we'll definitely be doing this again!
This map-making project concludes second grade's art lessons for the year. This project fits with the map skills unit students have just completed in social studies. In Art, students learned about cartography- the art of making maps! I started the lesson by showing this 2-minute clip from the Wizard of Oz. It's the scene where Dorothy sees Oz for the very first time. I asked students to imagine that like Dorothy, they were experiencing a new land for the first time. What kind of land would it be? How would things look different? We used these imaginative maps as our inspiration...    (Map images are from the Etsy shop PaintandInk.) My kids were SOO excited to begin this project!! Normally this close to summer, students get a little wild and hard to manage, but these second-graders were the most focused I have seen them all year! They LOVED this project! The requirements for the maps were that they had to show both land and water, have a title, and have a legend/key and a compass rose. Anything else was up to them! I wish I'd started this project a little sooner- we didn't have time to finish. I let students take their maps home with them to complete since we ran out of time. Next year I'll start this project a couple of weeks sooner! Here are some of the in-progress map drawings.      |
Archives
March 2018
Categories
All
|


 RSS Feed
