I developed this lesson based on a conversation with one of our kindergarten teachers a couple of years ago. We were talking about their unit on communities, and how one aspect of that unit involved learning to read and create maps. The teacher said that her students often have a hard time grasping that maps are drawn from ABOVE- instead, students tend to draw maps as scenes, with all the buildings sitting beside each other. I knew there had to be a way I could teach that concept through Art. Over the last couple of years, I have tried several different activities to teach about a "bird's eye view" and never quite found the right lesson for our kids. But this year, I think I might have found it! I am interested to hear from our kindergarten teachers if they notice an improvement in student's understanding of map-making. I had three goals for this lesson:
This was a two-part lesson. The activity for both weeks was to paint a tree. In week 1, we painted a tree from BELOW. In week 2, we painted trees from ABOVE! I wanted students to notice the differences in how the trees looked and be able to represent each view with an artwork. PART ONE: To start off week 1's lesson, I showed the students Georgia O'Keeffe's painting The Lawrence Tree. I didn't tell them what the painting was- instead, I asked them to interpret what they saw. Some kids had really creative interpretations- "an octopus!" was an answer I heard more than once! Eventually we came to the conclusion that it was a tree. By asking guiding questions like "What's unusual about this tree?" and "How does this tree look different from the one we see outside the window?" I was able to get kids to verbalize that the artist was under the tree and looking up into the night sky.  Georgia O'Keeffe The Lawrence Tree 1929 The painting experience for this part of the lesson was a lot of fun. We got to go outside and enjoy the beautiful fall weather! We sat under a tree and looked up. First we talked about some of the things we noticed- especially the shape and width of the trunk. We talked about how it looks really thick and strong at the bottom, but as you look further up into the tree, the trunk looks thinner and far away. I showed them The Lawrence Tree again, and we noticed how the trunk made the shape of a triangle. We also talked about the branches and twigs, and how they get smaller and more delicate as you look further up into the tree. Then it was time to paint! I didn't give much instruction or do any modeling of how to paint the tree; instead, I wanted students to create their own interpretation. Many of the kids really had a strong grasp of the concept, while others were not quite ready for it yet.      Next we came back inside and added some green leaves to complete our view of a tree from underneath.    We ended the day with a look at Tana Hoban's book Look Up, Look Down. It's a wordless book full of photographs that ask the viewer to decide whether we are looking UP or looking DOWN at the image. It was the perfect transition into next week's lesson!      PART TWO: In the second lesson of this unit, we looked at trees from ABOVE! First I asked students to summarize what we did the previous week. Then I told the that this week we would be looking at the opposite view- instead of going underneath a tree, this time we were going to go UP!  I told them we were going to pretend to go up in the sky on a hot air balloon. We watched this video to see what it would be like. I asked them to be sure to notice the trees and how they looked different depending on how high the balloon was. Then I gave each student an aerial photograph, similar to the scenes we saw in the video. I asked them to paint what they saw- focusing on realistic shapes and details. We talked about how the trees looked- why didn't we see any of the trunks? Then each student began working on their painting, representing the photo to the best of their ability.     As in the previous painting activity, some students had a clear understanding and it was evident in their work. Several students weren't quite ready to grasp this concept, and we will revisit it again. I am hoping that with some more intensive instruction from their teachers in the upcoming unit, that it will finally "click" for them! Here are some of the finished paintings, paired with the reference photo the student used.   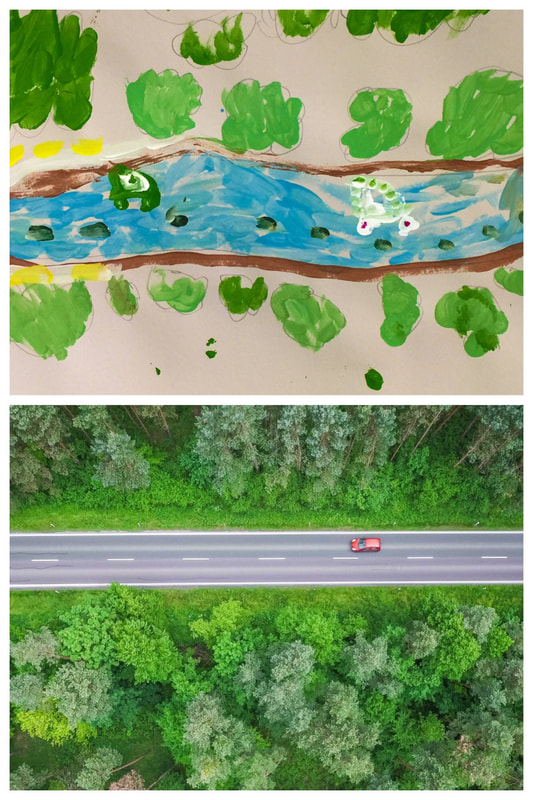  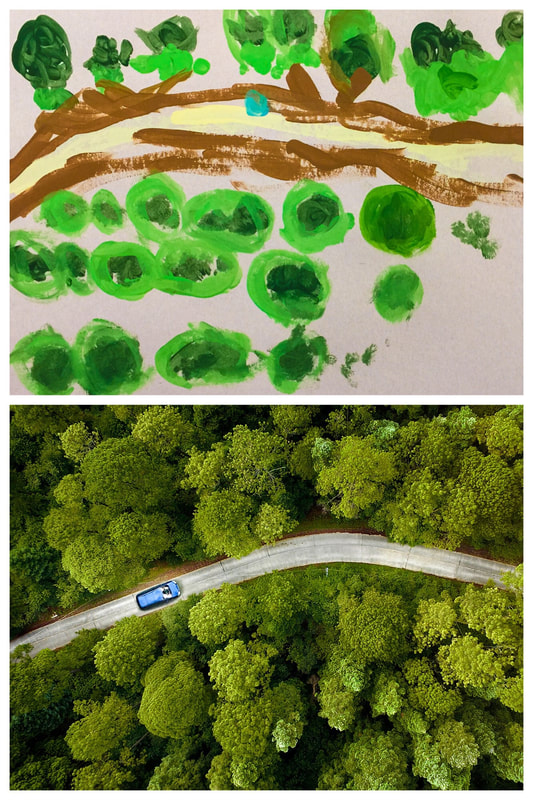 I want to share two more books I was able to use in this unit. The first is Looking Down by Steve Jenkins- one of my favorite illustrators. This wordless picture book is made of cut-paper illustrations showing our world from varying distances. Each page takes us closer and closer (or further and further, depending on whether you start at the front or the back.) For this lesson, I shared the book beginning at the back- we started with this close-up view of a ladybug. Each page takes you higher to see more and more of the picture. The scenes where you can see the whole neighborhood were helpful when I talked about maps with the students.                Below is a link to a video read-aloud of the last book I shared. This is They All Saw a Cat by Brenden Wenzel. This book was recommended to me by another art teacher. It's a great visual representation of perspective- how we each see things from a unique point-of-view.
0 Comments
Leave a Reply. |
Archives
March 2018
Categories
All
|


 RSS Feed
