 Welcome back to school! It has been a great first few weeks. Very busy, but great! We started the year with a solar eclipse-themed artwork, to celebrate the "Great American Eclipse" that passed over us on August 21st. We started by looking at some artworks inspired by previous eclipses. We discussed how each artist interpreted the eclipse in a unique way and with a variety of materials.  Representing an eclipse through a pen-and-ink drawing.  And a painting.  With stained glass.  Wood-working techniques.  And quilting! Students then created their own interpretation of the eclipse using a chalk pastel technique. Here are our "Solar Eclipse Silhouettes"!             I love the detail this student added- a drawing of himself wearing his eclipse glasses!!
0 Comments
The timing of this project coincides with 3rd grade's focus on animals. When we started, classes had just visited the aquarium and got to see some interesting animals in real life! With that trip fresh in their minds, students began this drawing project. Our inspiration came from this example- it was made by a high school senior, so it really set the bar high for our 3rd graders! But I knew they could do it!  The students requested the species of animal they wanted to draw, and I found photographs for them. Then they had to make four separate drawings of that animal- one had to show the whole animal, and the others were to "zoom in" on some of that animal's characteristics. They were to especially focus on the animal's physical adaptations- camouflage patterns, scales, claws, webbed feet, etc. Here are some of the results!           I am SO proud of my students for their hard work on these drawings. Their artwork is amazing! Each student chose one of our state symbols to illustrate. These were their choices:
I asked students to illustrate each symbol using the "zentangle" style of drawing. You can read more about our process in this previous post. Here are the results of about eight weeks of very focused work!                  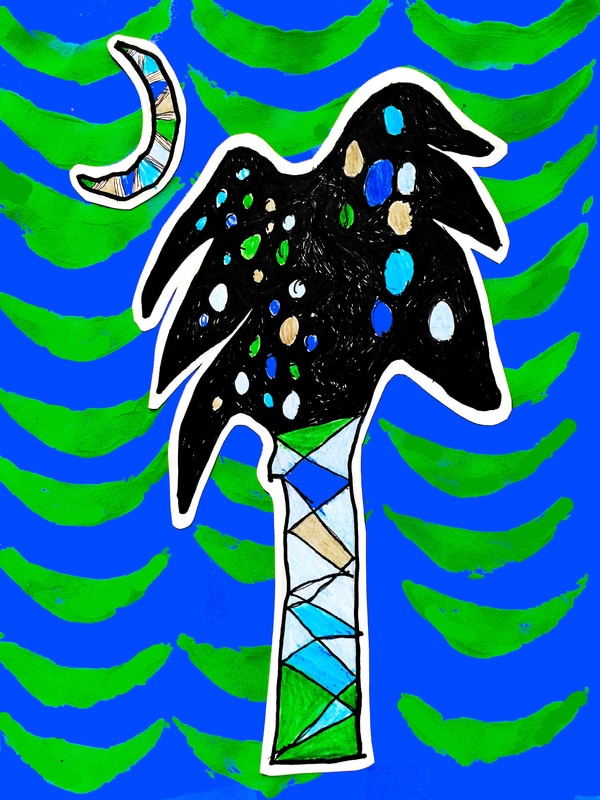           Third grade students have been working extremely hard on their current project. When I designed this project for them, I never imagined they would be as enthusiastic about it as they are! It is an incredibly time-consuming project and challenges their fine-motor skills, and they are amazing me with their commitment and effort. We are making zentangles! Zentangle is a term used for a doodling technique with a focus on intricate patterns. The process of creating a zentangle is meant to be very meditative. It helps increase focus and creative thinking. It is also very fun and relaxing! I am so pleased that my kids have enjoyed the process so much. Our zentangles are based on South Carolina symbols- our state tree, state bird, state flower, etc. More information about this project will be coming after our Art Show on March 23rd! Here are some in-progress photos. 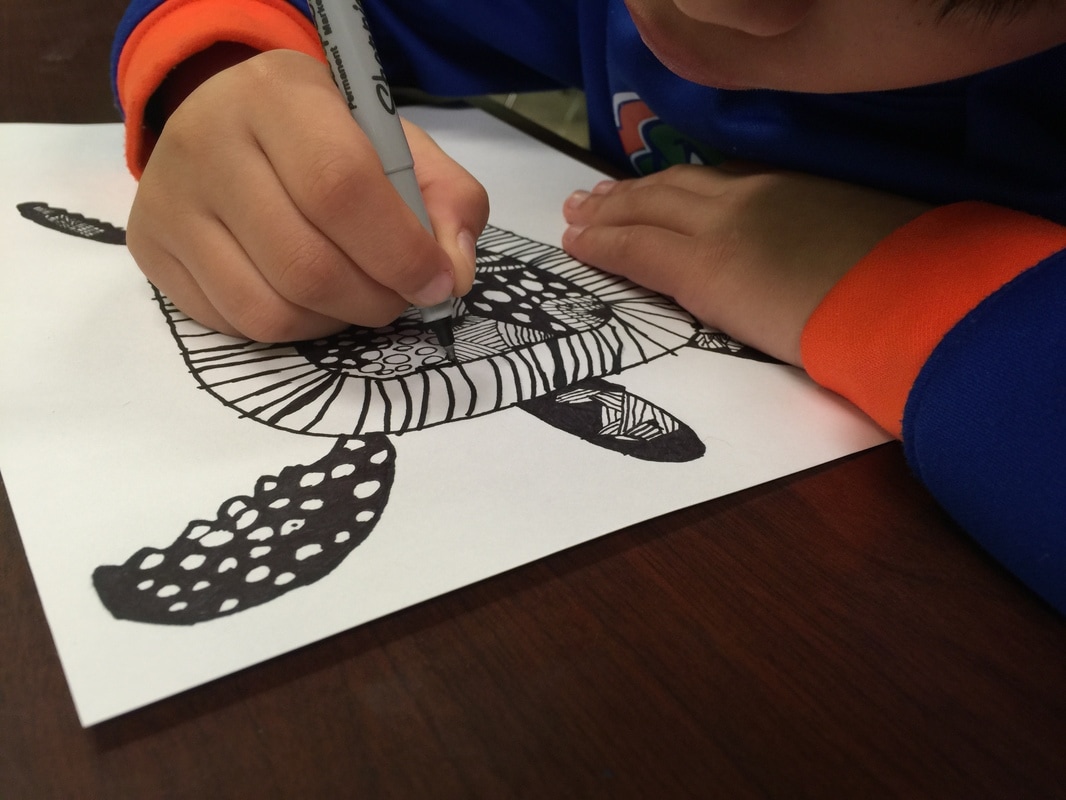     I am very pleased at the amount of success students had with this project! We began these paintings when third grade was in the middle of their unit about rocks and minerals. They experienced an in-school field trip where they got to go mining for real gemstones! Each student took home a collection of beautiful rocks. The students were so excited when I told them they would get to design their own crystals!  One of my favorite parts of this project was that I got to sneak in a lot of math skills. Students got lots of practice using rulers, though we used them more for making straight lines than measuring. We also talked some about lines, line segments, and vertices. I also briefly reviewed types of angles with them. Also, this drawing process was more complicated than our usual projects, so it was a good opportunity to practice following multi-step directions- which is a critical test-taking skill! After the crystal drawings were completed, then we talked about color. Students were required to plan a specific color scheme for this project- they couldn't just pick whatever colors they wanted. They needed to select a group of three analogous colors- these are colors that are all together on the color wheel. These were the colors of paint they would use. Next, students had to identify the complement of their analogous colors. Complementary colors are directly across from each other on the color wheel. It means they are like opposites. For example, red and green are complements, and I tell students that when you put red next to green, it makes the red look the "reddest" it can look. And green next to red makes the green look even "greener."  Students first used a crayon in the complementary color to color a few sections- this was our "accent color". Next, they painted the other spaces with the analogous colors. Can you see how the contrast makes each color "pop"? 
To give these crystals a little sparkle, students traced their lines with metallic markers. And it's hard to tell in the photos, but there's also a little glitter added to some of the spaces! The last step added a little scientific flair- students pretended this was a new gemstone they had just discovered, and they had to give their stone a name, tell how much money it was worth, and also tell one interesting fact- maybe something about how the stone was formed, where it was found, or how old the stone was. They came up with some really creative answers! This week's schedule was a little off due to our snow days. First and third grade classes were due to start a new project, but I wanted to hold off until all classes could start the same week. So we used this week for some extra practice with making narrative art- art that tells a story. My favorite master artist to show when discussing narrative art is Norman Rockwell. His pictures are so fun for students to interpret. We began the lesson by studying his painting "Roadblock".  "Roadblock" Cover for Saturday Evening Post 1949 We looked at the artwork and I asked them to answer some questions. They had to find clues in the picture to answer each question. First they had to identify the problem in the scene, and describe the main characters. Some of the other questions were really challenging! One of my questions was "What time of day is it in this scene?" and they decided it had to be morning because the kids had their bookbags and were walking to school. I asked why they couldn't be coming home from school instead, and they said it was because the lady on the balcony still had on her apron from cooking breakfast and her husband wasn't dressed in his work clothes yet. What a smart interpretation!!  Next, students completed a worksheet with the same questions on it. They had to think of an event from their life and answer the questions based on that event. Then, they had to find a way to make all of their answers evident in their drawing. For example, if it was a hot day, how will you show that? Are people sweating? Are they wearing summer clothes? Could you draw the sun really big? I wanted them to include details they might normally forget about- what the weather was like, the types of clothes people were wearing, even body language and facial expressions. These are first grade examples. We will complete their drawings next week, and if we have time, they will write a paragraph explaining their drawing. I am hoping that by focusing on drawing with more detail, they will be encouraged to write using more detail.   And these last examples are from a third grade class. They were able to get more accomplished in one class period, so their drawings are more complete.    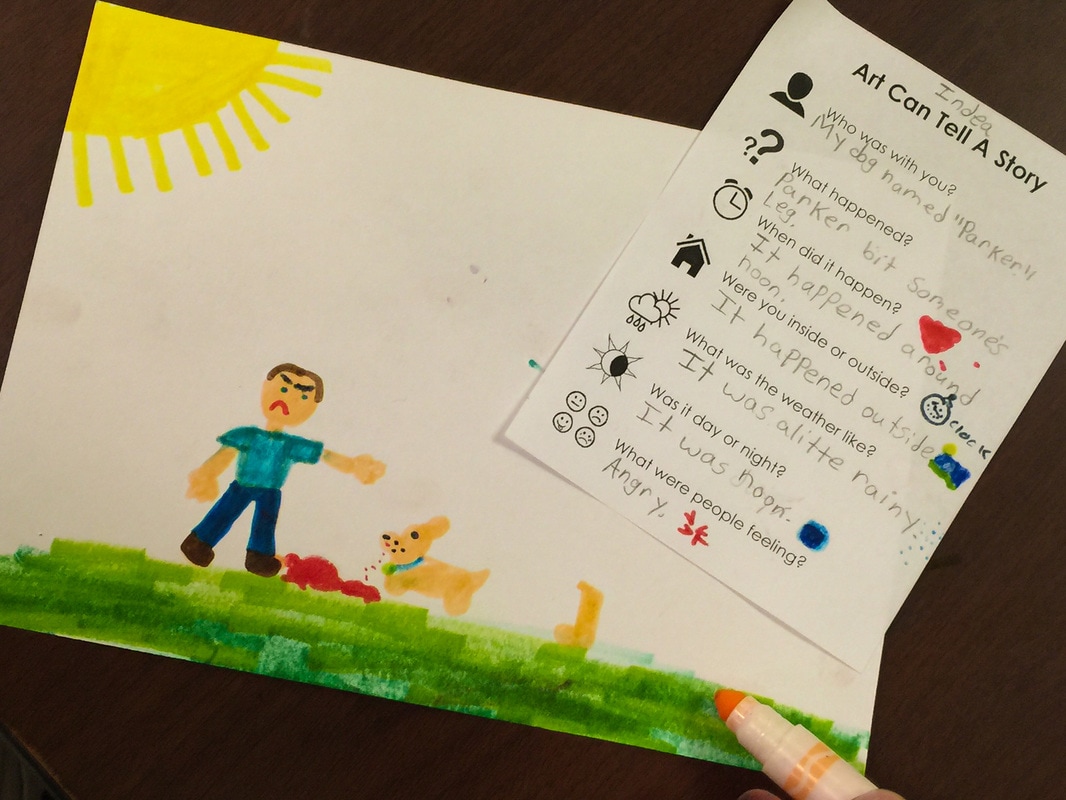  Third graders have just started a new science unit on rocks and minerals. Last week, they had an in-house field trip where they got to experience mining for gemstones! In support of this learning, our next big art project will be a geometric gemstone painting project. To get us started, students spent this week's art class making detailed observational drawings of rocks.       Third grade's ELA curriculum recently focused on how an author's word choice helps to set the mood of a written work. We have been talking about how artists create mood, too! We started out by viewing some artwork in which the subject matter clearly communicates a mood. We looked at the colors used, as well as the body language of the figures.
After some class discussion of those examples, we began looking at some non-objective artworks. (Non-objective literally means "no object"- it's artwork made solely from lines and shapes and colors. Often people refer to this type of art as "abstract" but that's actually a whole different category.) In non-objective work, the energy (calm, swirling, jagged, etc.) in addition to color, contributes to the mood.
Students then created their own non-objective mood paintings. They divided their papers into fourths and painted each section to show a different mood. They were to consider both their color choices and the energy of the mark-making to successfully communicate their chosen moods.    When students finished their paintings, their next task was to use sticky notes to analyze the moods of several artworks on display in the room. They needed to tell what mood they interpreted and then explain their thinking. I was impressed with their critical thinking skills! And I loved the enthusiasm they showed for this activity!   Third graders have been learning about natural resources and how their availability affects societies. This is a very complicated concept for third-grade minds! To help make the idea a little more concrete, we looked at the artist Andy Goldsworthy. Goldsworthy's art is made from items he finds in nature. He gains his inspiration from the materials that are around him. In the winter, he may decide to use icicles to make a sculpture, or he might make a design with colored leaves in the fall. He could use flower petals in spring, or river rocks in summertime. I wanted students to understand that the materials he chooses is dependent on their availability- just like societies are limited to using resources that are available to them. Students watched a short video about Goldsworthy's work and then we had a class discussion about his designs. The students were fascinated by the idea that his work was temporary- you couldn't "keep" it! This lead to a great discussion of WHY artists make art- it's not always about the end result, sometimes we make art just for the process of making it! Next students got to make their own nature designs! I put out baskets of natural supplies like leaves, bark, rocks, flower petals, and sticks, and encouraged them to explore the materials any way they wished. Many students chose to make radial designs. They could work in teams or individually, and used iPads to photograph their work. I had planned for this to be a one-week-only experience, but every single class requested to do this the next week, too! So we did!      It has been so hard to wait to share this student work! This project has turned into one of my favorites. It's the first time we've tried this, and I already can't wait to do it with next year's third graders! I love when Art can mesh so well with other subjects, like it does through this project. Third graders have been studying various landforms and bodies of water- islands, peninsulas, mountains, rivers, etc. To support that learning, as well as gain some color-mixing experience, students made paintings inspired by Google EarthView images. These photos are satellite images of the earth's surface, and they are just beautiful! Each student chose a photo and spent about 5 weeks turning it into a painting. I wanted each student to be able to identify the landforms found in their photo, and then to recreate the image as accurately as possible. We spent one whole class period just practicing mixing colors! I also wanted students to truly LOOK at their photo and replicate even the tiniest details and textures. And here are the finished products! They are such close matches that it's hard to tell which is the student painting and which is the photograph! The student work is the top photo, and the image from Google is at the bottom.        |
Archives
March 2018
Categories
All
|


 RSS Feed
